Space Haven Guide
Space Haven Ship Layout Guide: Starter Tube and Blocks
Build a safer Space Haven ship with starter tube and mid-game block layouts, storage routes, industry rooms, greenhouse separation, and defense tips.
The best ship layout in Space Haven 1.0 is not the prettiest one.
It is the layout that keeps your crew alive when storage routes get overloaded, smoke fills the industry room, plants need warmer temperatures, pirates attack, or your ship grows too heavy to manage cleanly.
A good layout does three things:
- Separates risk — industry, greenhouse, living rooms, storage, and defense should not all share one space.
- Shortens hauling — airlock, storage, kitchen, industry, and medical rooms should be placed around real crew movement.
- Leaves expansion paths — your first safe layout should become your mid-game layout, not fight against it.
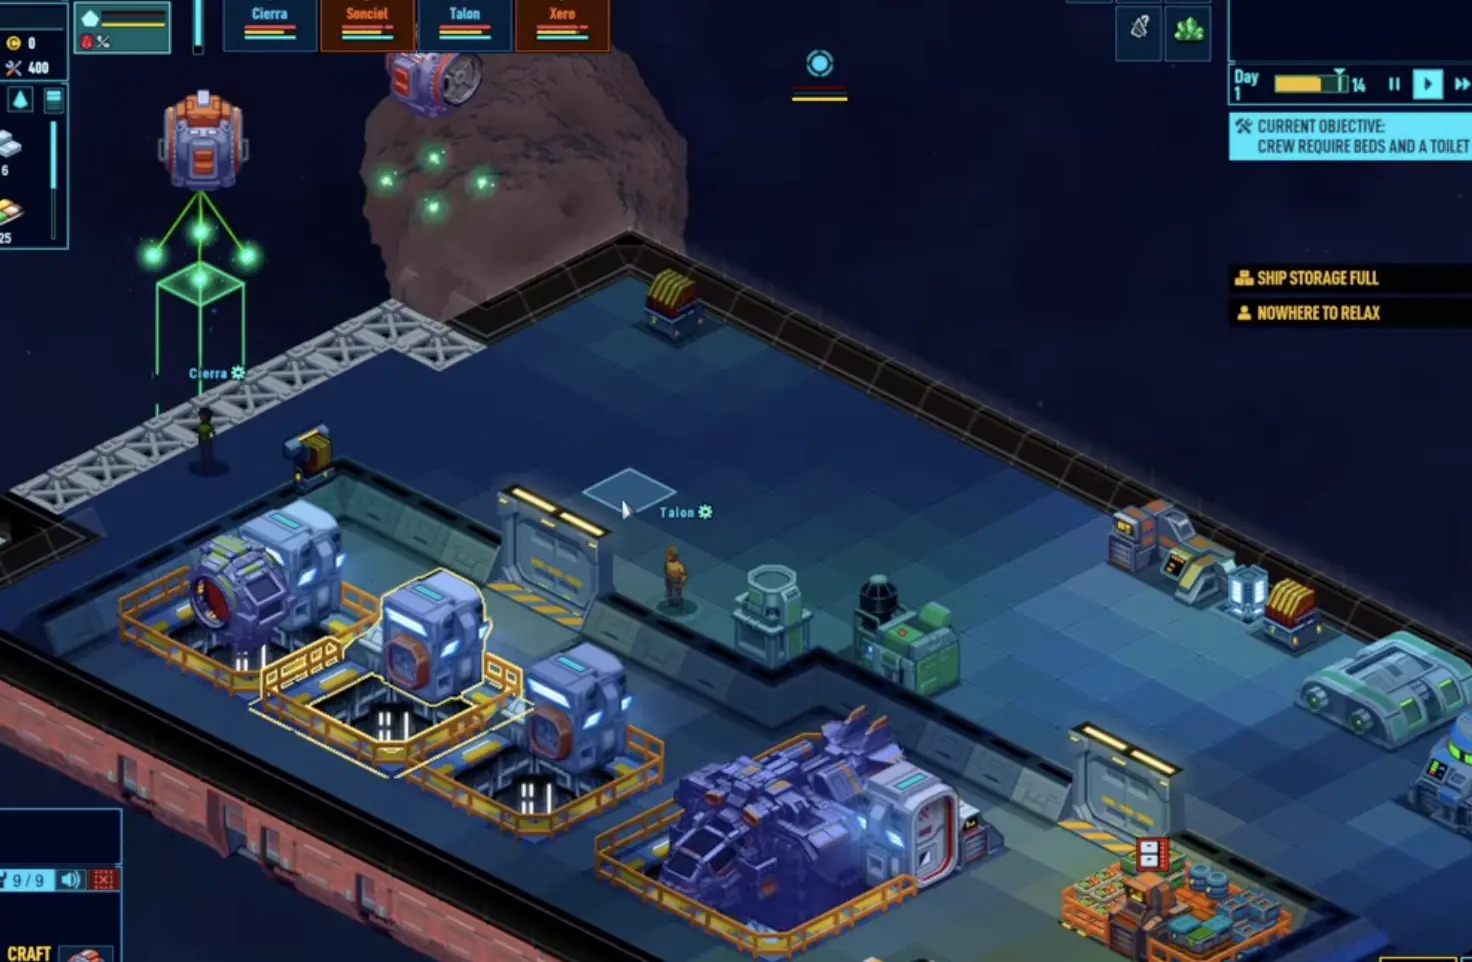
The Starter Tube works because it is easy to read: command in front, people in the middle, storage beside the airlock, and dangerous work toward the rear. Do not copy the exact shape blindly. Copy the logic.
Fast Answer
| Layout question | Best beginner answer |
|---|---|
| What is the safest layout rule? | Separate risky rooms and keep hauling routes short. |
| Where should storage go? | Beside the airlock first, then split by food, medicine, industry, and fuel later. |
| Where should industry go? | In a room that can be sealed, scrubbed, and vented if smoke or fire appears. |
| Should greenhouse share a room with bedrooms? | No. Crops and crew prefer different room conditions. |
| Should I use Sketch before building? | Yes. Sketch the major blocks before spending hull blocks and moving walls. |
| Is Mining Station start good for layout planning? | Yes. It gives you more freedom to plan before turning the build into a full survival ship. |
| When should I split into multiple ships? | Only after one ship is stable and industry, combat, or logistics are becoming too cramped. |
The 1.0 Layout Rule: Separate Risk, Shorten Hauling
A beginner mistake is building one giant room because it feels efficient.
It is not.
One shared room can work for a few early days, but it becomes dangerous once you add industry, grow beds, larger storage, weapons systems, prisoners, more crew, or more heat-producing facilities.
Think of your ship as a set of blocks:
| Block | Main job | Place it near |
|---|---|---|
| Bridge / command | Navigation, operations, ship control | Living core, defense access |
| Living core | Beds, dining, toilets, comfort | Kitchen, med bay |
| Storage hub | Salvage, trade, construction materials | Airlock |
| Kitchen / food storage | Meals, algae, emergency food | Living core, greenhouse |
| Greenhouse | Grow beds, water, crop temperature | Kitchen, water storage |
| Industry room | Recycler, refinery, production | Industrial storage |
| Med bay | Recovery after combat or accidents | Living core, defense route |
| Defense block | Weapons, shields, point defense | Bridge, outer hull access |
| Engines / hyperdrive | Propulsion and jump support | Rear or dedicated propulsion block |
Do not treat these blocks as decoration. Each one exists to solve a problem.
Plan First: Sketch and Mining Station Start
If you want a cleaner ship, plan before you build.
Mining Station start is useful because it gives you more room to think before your ship becomes a chain of emergency patches. You can plan the main blocks, sketch corridors, and decide where dirty industry should go before the whole layout becomes difficult to move.
Use Sketch to mark the ship before committing resources.
| Sketch area | What to plan |
|---|---|
| Central core | Beds, dining, toilets, comfort, med bay access. |
| Airlock side | General storage, salvage unloading, trade flow. |
| Rear or side block | Recycler, refinery, production, power. |
| Warm block | Greenhouse, water, food logistics. |
| Outer edge | Weapons, shields, point defense, hull access. |
| Future expansion | More crew rooms, bots, second storage, larger industry. |
Do not sketch every facility tile. Sketch the room blocks first. The goal is to avoid putting your kitchen, recycler, grow beds, and bedrooms into one shared room.
Planning Priorities Before You Build
Space Haven layouts change by start, crew size, difficulty, resources, and ship shape. These are planning priorities, not exact tile formulas.
| Priority | Practical rule |
|---|---|
| Temperature split | Keep grow rooms separate from living rooms. Crops can run warmer; crew rooms should stay comfortable. |
| Storage route | Airlock to storage should be one of the shortest routes on the ship. |
| Industry risk | Industry should be sealable before it becomes large. |
| Medical response | Med bay should sit near the protected core and not far from combat routes. |
| Defense access | Weapons and shields should be reachable without crossing bedrooms or dirty industry. |
| Main corridors | Avoid blocking the storage-airlock route, kitchen route, and med bay route. |
| Future hull expansion | Leave at least one side of your ship available for new blocks. |
The most important number is not a tile count. It is travel time. If crew spend more time walking than working, the layout is stealing labor.
Layout A: Starter Tube
Use the Starter Tube when you are still learning the game or playing a resource-tight start.
The idea is simple: build the ship as a functional line first, then add side blocks later.
| Section | Recommended use |
|---|---|
| Front | Bridge, command, navigation. |
| Middle | Living core, kitchen, dining, toilet, basic comfort. |
| Airlock side | General storage and salvage unloading. |
| Rear | Industry, power, recycler, refinery, and later engines. |
A simple Starter Tube flow looks like this:
Bridge / Control → Living + Kitchen → Storage Hub + Airlock → Industry / Power / Recycler
This layout is strong because it gives you a stable early spine. You are not trying to solve the whole game at once. You are making sure the first ship does not collapse from bad storage, smoke, or crew walking distance.
Starter Tube Build Order
- Stabilize oxygen, temperature, power, beds, toilet, and food.
- Put general storage close to the airlock.
- Keep kitchen and dining close to food storage.
- Move recycler, refinery, and production into a separate room as soon as possible.
- Add gas control before the industry room becomes dangerous.
- Add greenhouse, med bay, and defense blocks after survival is stable.
The Starter Tube is not meant to be your final ship. It is a safe starting shape that can grow into a better block layout.
Layout B: Mid-Game Block Layout
Once food, water, power, and crew schedules are stable, shift from a tube into blocks.
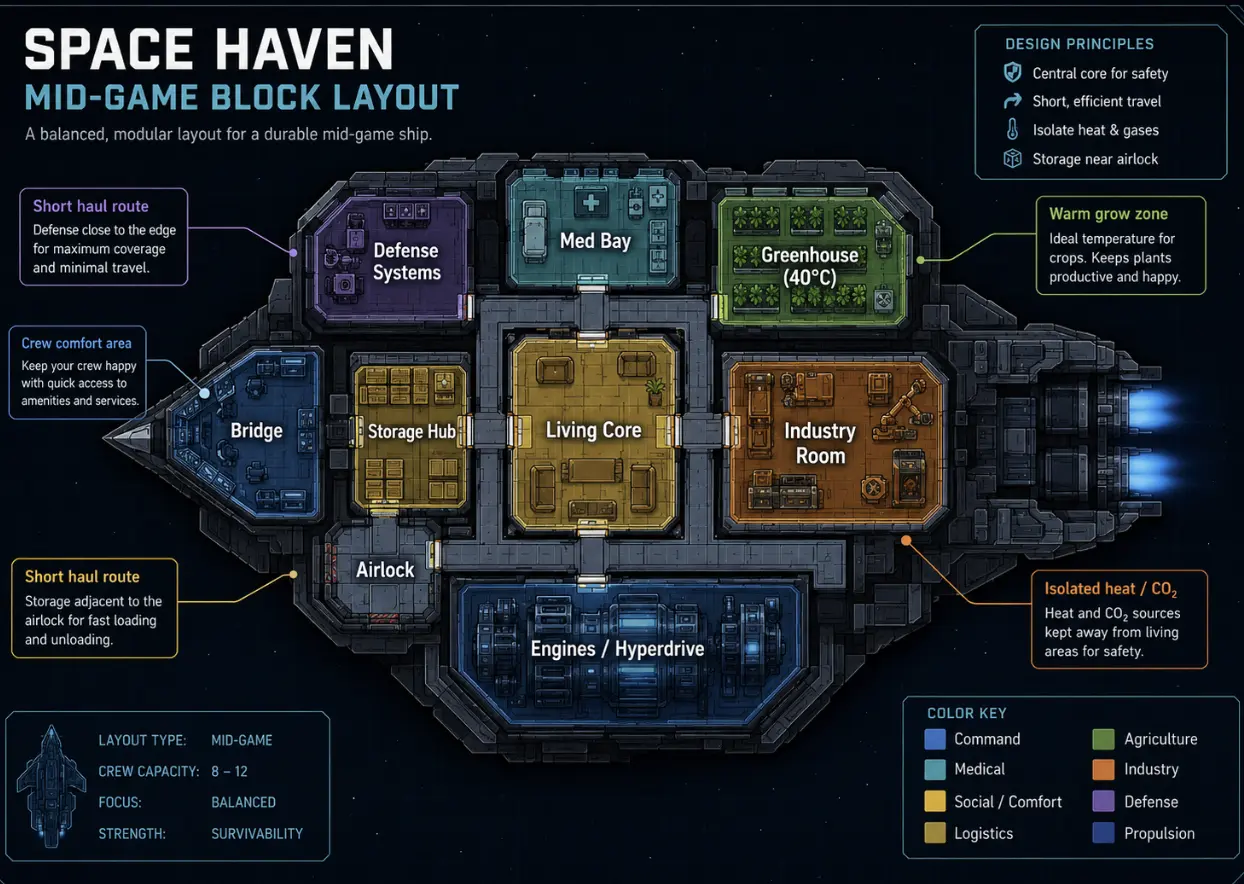
In this mid-game layout, the Living Core stays protected in the center. The Storage Hub sits beside the Airlock to reduce hauling. The Greenhouse is separated so it can run warm without overheating crew rooms. The Industry Room is isolated because it creates heat, CO2, smoke, and fire risk.
The Defense Systems block sits near the outer-left side, close to the Bridge and Med Bay. That position matters: crew can reach combat stations quickly, injured fighters can move back toward medical support, and the Living Core stays behind a safer central route instead of sitting directly behind the airlock.
| Block | Recommended position | Purpose |
|---|---|---|
| Bridge | Front or protected forward side | Navigation and command access. |
| Living Core | Center | Beds, dining, comfort, and daily crew traffic. |
| Storage Hub | Next to airlock | Fast salvage, trade, and construction hauling. |
| Airlock | Beside storage | Short unloading route. |
| Med Bay | Near living core and defense route | Fast recovery after accidents or boarding. |
| Greenhouse | Separate side block | Warm crop room with water access. |
| Industry Room | Opposite greenhouse or rear side | Contains heat, CO2, smoke, and fire risk. |
| Defense Systems | Outer edge near command access | Weapons, shields, point defense, and combat response. |
| Engines / Hyperdrive | Rear or dedicated propulsion block | Keeps propulsion expandable and away from bedrooms. |
The goal is not symmetry. The goal is isolation, short routes, and safe response time.
Room Placement Rules
This section is the practical checklist for placing each room.
Storage
Storage is your ship’s traffic system.
If storage is far from the airlock, every salvage trip becomes slower. If food is far from the kitchen, meal production slows down. If medicine is far from the med bay, injuries take longer to recover from. If industrial inputs are far from production, your crew waste the day hauling.
| Storage type | Best location |
|---|---|
| General salvage | Near the airlock. |
| Food | Near kitchen and dining. |
| Water | Near greenhouse and food production. |
| Medicine | Near med bay. |
| Industrial inputs | Near industry room. |
| Fuel / energy | Near generators, but not inside a hazard mess. |
| Weapons / armor | Near defense or boarding prep area. |
Once you get logistics or salvage bots, storage placement still matters. Bots reduce hauling pressure, but they do not fix a bad route. A bad warehouse simply becomes a bad warehouse with robots walking through it.
Industry
Your industry room should be designed as if something will go wrong.
Recyclers, refineries, and production facilities are useful, but they create layout problems. They can produce heat, CO2, smoke, and fire risk. Keep them away from bedrooms, dining, and medical areas.
A good industry room should have:
| Feature | Why it matters |
|---|---|
| Door separation | Slows smoke, heat, and fire spread. |
| Gas control | Helps manage CO2 and bad gases. |
| Vent option | Gives you an emergency purge route. |
| Nearby industrial storage | Reduces hauling time. |
| Safe access | Lets crew respond without crossing the whole ship. |
Do not make the room permanently dangerous unless you know exactly what you are doing. For beginners, the safer version is a normal room that can be sealed, scrubbed, and vented when needed.
Greenhouse
Your greenhouse should not be part of your bedroom or dining room.
Plants and crew do not want the same environment. Crew living rooms should stay comfortable. Grow rooms can run warmer and need their own water, CO2, and thermal control.
A good greenhouse should have:
| Feature | Why it matters |
|---|---|
| Separate door | Stops greenhouse conditions from spreading into living rooms. |
| Thermal control | Lets you tune the room for crops. |
| Water access | Reduces hauling for grow beds. |
| Nearby food storage | Speeds up kitchen and meal production. |
| Expansion space | Lets you add grow beds before food collapses. |
A shared bedroom-greenhouse may work briefly, but it becomes a comfort and temperature problem later.
Med Bay
Do not treat the med bay as decoration.
The med bay is a response room. Put it where response time matters.
| Good placement | Bad placement |
|---|---|
| Near living core | At the far rear behind industry |
| Near defense route | Beside smoke-prone machines |
| Near medicine storage | Far from all storage |
| Protected from first boarding path | Directly exposed behind the airlock |
If you fight derelicts often, place the med bay where boarding teams can return quickly. If you expect pirates or ship combat, keep it close to the protected center.
Defense
Ship layout is not only about comfort. It also affects combat.
Your defense block should not be buried at the back of the ship. In the Mid-Game Block Layout above, the defense room works because it sits near command access, near the med bay route, and close to the outer hull.
| Defense placement | Why it works |
|---|---|
| Near Bridge | Command crew can reach weapons and shields quickly. |
| Near Med Bay | Injured fighters do not cross the entire ship. |
| Near outer hull | Defense systems support the side they protect. |
| Away from bedrooms | Combat traffic does not cut through living rooms. |
| Away from industry | Fire or gas should not disable your combat response. |
For boarding defense, do not put beds or dining directly behind the airlock. Use doors, short retreat paths, and a safe route back to the med bay.
When to Split Into a Fleet
Do not split into multiple ships just because you can.
Split when one ship is becoming unsafe, cramped, or inefficient.
| Sign | What it means | Fleet answer |
|---|---|---|
| Industry keeps threatening living rooms | Dirty production is too close to crew spaces. | Move heavy production to an industry ship. |
| Storage routes are too long | One warehouse is serving too many jobs. | Add support storage or a logistics-focused ship. |
| Combat systems crowd the main ship | Weapons and shields are eating living space. | Build a combat escort. |
| Mining and salvage overload your crew | The main ship cannot keep up with hauling. | Build a mining or support ship. |
| Crew comfort keeps dropping | The ship is doing too many jobs at once. | Keep habitat functions on a dedicated main ship. |
A simple fleet progression is:
Main survival ship → industry ship → combat escort → mining/support ship
Use that order as a progression, not a rush goal.
Move from a single survival ship to an industry ship when your main ship already has stable food, water, power, beds, and crew schedules, but dirty production is starting to crowd the living area. If your recycler, refinery, and production chain are creating heat, CO2, smoke risk, or long hauling routes, that is the first good reason to split.
Add a combat escort only after your economy can support extra fuel, crew, weapons, shields, and repairs. If pirates or hostile ships are forcing you to flee often, or your main ship is sacrificing too much living space for weapons and shields, a combat-focused ship starts to make sense.
Add a mining/support ship later, when salvage, asteroid mining, and hauling are slowing down your main ship. This is usually a fleet-stage upgrade, not an early survival fix.
Fleet layouts are powerful, but every extra ship adds new problems: power, crew, logistics, fuel, defense coverage, and jump planning. Do not split before your first ship is stable.
Layout Troubleshooting
Use this table when a layout feels bad but you are not sure why.
| Problem | Likely cause | Fix |
|---|---|---|
| Salvage takes forever | Storage is too far from airlock. | Move general storage beside airlock. |
| Crew are always walking | Too many jobs are far apart. | Group storage, kitchen, industry, and med bay by use case. |
| Bedrooms become uncomfortable | Industry, greenhouse, or traffic is too close. | Move living core to a safer central block. |
| Greenhouse causes comfort issues | Crops share space with living rooms. | Build a separate grow room. |
| Fire or smoke spreads too fast | Industry is not isolated. | Add doors, gas control, and vent options. |
| Injured crew take too long to recover | Med bay is too remote. | Move med bay near central and defense routes. |
| Combat response is slow | Defense systems are buried behind other rooms. | Put defense near command and outer access. |
| Bots do not seem to help | Storage routes are still bad. | Split storage by function and shorten paths. |
FAQ
Is Mining Station start better for ship planning?
Yes, if your goal is a cleaner layout. Mining Station start gives you more room to sketch a ship plan before committing to messy emergency expansion.
How do I use Sketch for ship layout?
Use Sketch to mark future blocks first: living core, airlock storage, greenhouse, industry, med bay, defense, and engines. Do not place every facility immediately.
Where should I put defense systems?
Place defense systems near command access, close enough to the outer hull to support the side they protect, and close enough to the med bay that injured crew do not cross the full ship.
When should I build a separate industry ship?
Build one when your main ship’s industry room is too large, too dangerous, or too far from storage. Do not split industry before you can support the extra power, crew, logistics, and defense needs.
Do bots fix bad storage layout?
No. Bots reduce hauling pressure, but a bad route is still a bad route. Bots work best when storage is already separated by function and close to the jobs that use it.
Should I build one big ship or multiple smaller ships?
Start with one stable ship. Move to multiple ships only when your main ship is becoming unsafe or inefficient. A fleet gives you specialization, but it also adds power, fuel, logistics, crew, and defense problems.
Continue Reading in the Space Haven Guide Cluster
This article is part of our Space Haven strategy cluster. Use these guides to keep learning the game's core systems and routes.
Survive the Space Haven 1.0 early game. Follow our exact first 7 days build order to set up life support, power nodes, and prep for your first jump.
Crew GuideSpace Haven Crew Not Working? Fix Idle Crew in 1.0Crew standing around in Space Haven 1.0? Use our troubleshooting guide to fix idle crew, correct work priorities, and resolve broken logistics fast.
Power GuideFix Space Haven Blackouts: 1.0 Power & Threshold GuideRunning out of power in Space Haven 1.0? Learn how to fix blackouts, set generator threshold links, manage power nodes, and produce energy rods.
Survival GuideSpace Haven Food and Water Guide: Algae, Ice, Grow BedsFix Space Haven food and water problems with algae, ice, grow beds, balanced meals, fertilizer, nutrient deficiency, and early farming tips.