Battlestar Galactica Guide
Crisis & Fleet Management Guide: BSG Scattered Hopes
Master crisis and fleet management in BSG: Scattered Hopes. Learn to handle resources, Cylon infiltrators, faction politics, morale, and civilian ships.
Fleet management is where most runs in Battlestar Galactica: Scattered Hopes are won or lost. Combat looks louder, but the real collapse usually starts between jumps: a ship crosses a critical threshold, supplies disappear into the wrong crisis, a faction offer creates a bigger conflict later, or a Cylon infiltrator keeps sabotaging the fleet while you delay the investigation.
The best fleet-management mindset is:
Every action costs more than the listed resource, because it also costs time.
This guide explains how to prioritize situations, classify crisis types, manage resources, handle faction politics, investigate Cylon infiltrators, protect civilian ships, and prepare each sector without overspending.
Fleet management priority table
Use this table whenever the sector gives you too many problems at once. It combines the three decisions that matter most: fix, ignore, or bypass.
| Problem | Priority | What to do | When to ignore or bypass |
|---|---|---|---|
| Fleet Health or Gunstar hull can hit zero | 1 | Fix immediately. Nothing else matters if the run ends. | Almost never ignore. |
| A key ship will cross a critical threshold | 2 | Repair if it is the Gunstar, a resource ship, or a civilian defense candidate. | Ignore only if the ship is low-value and not entering battle. |
| A crisis creates a multi-sector penalty | 3 | Usually solve, especially if it raises future repair costs or locks ship effects. | Bypass only if the penalty is temporary and solving it would empty your resources. |
| Cylon sabotage is repeating | 4 | Continue the investigation before losses stack. | Delay only if you have weak clues and no repeated sabotage yet. |
| A faction conflict threatens civil unrest or ship effects | 5 | Stabilize if the penalty affects several sectors. | Accept a small relationship hit if the reward prevents a worse crisis. |
| You are low on Tylium | 6 | Take fuel POIs or use travel/fuel heroes before optional spending. | Skip weak POIs that cost fuel but do not fix your route problem. |
| You are low on supplies | 7 | Save supplies for medical, food, repair, crisis, or infiltrator steps. | Ignore small one-time Fleet Health losses if supplies are needed for a worse crisis. |
| A POI gives a resource you urgently need | 8 | Take it if the timeline is safe. | Skip it if the turn cost makes an important situation expire. |
| A civilian ship can be trained safely | 9 | Train only if it produces useful resources and will survive long enough to pay back. | Skip training if a battle, crisis, or repair need is close. |
| Optional reward or bar event | 10 | Take only when the fleet is already stable. | Ignore if the reward does not solve your current bottleneck. |
Do not fix problems in the order they appear. Fix the problems that would create the worst chain reaction.
What fleet management is really testing
Fleet management is not a shopping phase. It is a triage phase.
Every sector asks you to balance:
- immediate repairs,
- expiring situations,
- multi-step crises,
- Cylon sabotage,
- POI rewards,
- civilian ship training,
- hero XP,
- R&D upgrades,
- faction politics,
- morale events,
- preparation for the next battle.
Your goal is to enter the next battle with:
| Requirement | Why it matters |
|---|---|
| Enough Gunstar hull | The Gunstar dying ends the run. |
| Enough Fleet Health | Fleet Health reaching zero ends the run. |
| Enough Tylium | Tylium keeps route and POI options open. |
| Enough supplies | Supplies solve damage, food, medical, and investigation problems. |
| Enough scrap | Scrap repairs ships and funds R&D. |
| At least one useful hero action | Hero actions can replace expensive resource costs. |
| Healthy civilian ships | Civilian ships create long-term resources and absorb battle pressure. |
Leaving a sector rich but damaged can kill you in the next fight. Leaving healthy but broke can kill you in the next crisis. Balance matters.
Crisis types and how to handle them
Not every problem should be treated the same way. The game presents many events as “situations” or “crises,” but they usually fall into a few practical categories.
| Crisis type | Typical symptom | Main risk | Best response |
|---|---|---|---|
| Ship damage crisis | A ship is damaged, malfunctioning, or near a threshold. | New negative situations after the jump. | Repair key ships first; ignore low-value ships if resources are tight. |
| Resource shortage crisis | Food, medicine, fuel, supplies, or scrap are low. | Forced bad choices later. | Take matching POIs, use hero bonuses, avoid optional spending. |
| Faction conflict crisis | Workers, Military, or Underworld demand incompatible choices. | Relationship loss, influence imbalance, follow-up unrest. | Pick the side that prevents the worse long-term penalty, not the biggest instant reward. |
| Cylon sabotage crisis | Bombings, suspicious behavior, or repeated unexplained damage. | Fleet Health loss, ship/system damage, escalating investigation pressure. | Track clues, investigate once suspect pool narrows, do not let sabotage repeat unchecked. |
| Hero morale crisis | A hero loses morale, health, or trust. | Personal crisis or loss of useful hero actions. | Protect key heroes when affordable; sacrifice morale only when fleet survival demands it. |
| Opportunity chain | Multi-step event with a reward. | Spending turns/resources before a real crisis. | Take only if the reward solves a current shortage or advances a major objective. |
The simplest rule
Situations are about avoiding penalties. Opportunities are about gaining value. Crises are about preventing disaster.
If you treat all three as equally urgent, you will overspend.
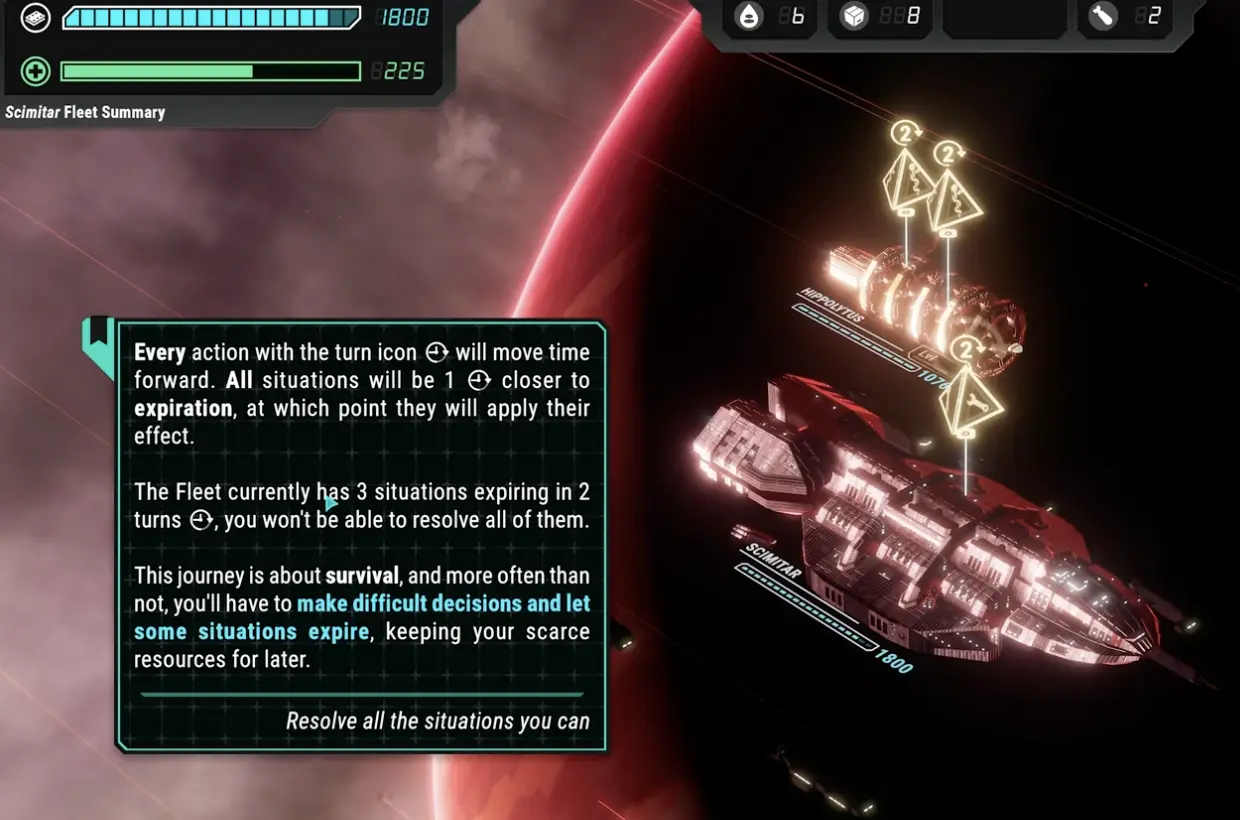
How the turn clock works
Every action with a turn icon advances time. As time advances:
- situations move closer to expiring,
- crises progress,
- safe turns disappear,
- the Cylon threat gets closer,
- your chance to prepare for battle shrinks.
This is why a “cheap” action may not actually be cheap. Spending one turn to gain a small reward can cause a situation to expire or push you into battle before you repair.
Before spending a turn, ask:
| Question | Why it matters |
|---|---|
| What expires after this action? | You may trigger a penalty by clicking too fast. |
| Will this leave time to repair? | A good reward is bad if you enter battle damaged. |
| Do I need this resource now? | Optional gains can wait if the fleet is unstable. |
| Is a crisis about to start? | Save resources and heroes before the crisis appears. |
| Does this POI cost Tylium? | Fuel is route flexibility, not just a POI ticket. |
Resource management in one table
Tylium, supplies, scrap, hero actions, and turns all protect different parts of the run.
| Resource | Main use | Spend when | Save when | Common mistake |
|---|---|---|---|---|
| Tylium | FTL jumps, routing, POIs | Fuel POI is strong, route is important, or the POI solves a shortage. | You are low on fuel, crisis is coming, or reward is weak. | Spending fuel on optional POIs and losing route flexibility. |
| Supplies | Repairs, food, medicine, investigations, crisis steps | It prevents major Fleet Health loss, key ship damage, or Cylon sabotage. | Penalty is small, hero can replace the cost, or investigation may need supplies soon. | Spending all supplies before a medical, food, or infiltrator crisis. |
| Scrap | Repairs, R&D, ship upgrades, trade | A key ship is near a threshold, or R&D solves a repeated problem. | Gunstar/resource ships are damaged, Boss is coming, or repairs are likely. | Buying upgrades while ships are about to create negative situations. |
| Hero actions | POIs, crisis objectives, cost avoidance, XP | Resource cost is high, hero has a matching trait, or the step is urgent. | Crisis state is unclear, later objective may be expensive, or hero is needed for assignment. | Spending every hero on early POIs. |
| Turns | Hidden cost of most actions | The action prevents a worse penalty or gives a needed resource. | A situation is expiring, battle is close, or the reward is optional. | Treating time as free. |
Resource rule of thumb
- If you are dying in battle, spend on repairs and hull.
- If you are losing to crises, save supplies and hero actions.
- If you are running out of route options, protect Tylium.
- If damaged ships keep spawning problems, spend scrap on repairs before R&D.
- If your economy is stable, then invest in R&D and crew training.
Critical thresholds and ship damage
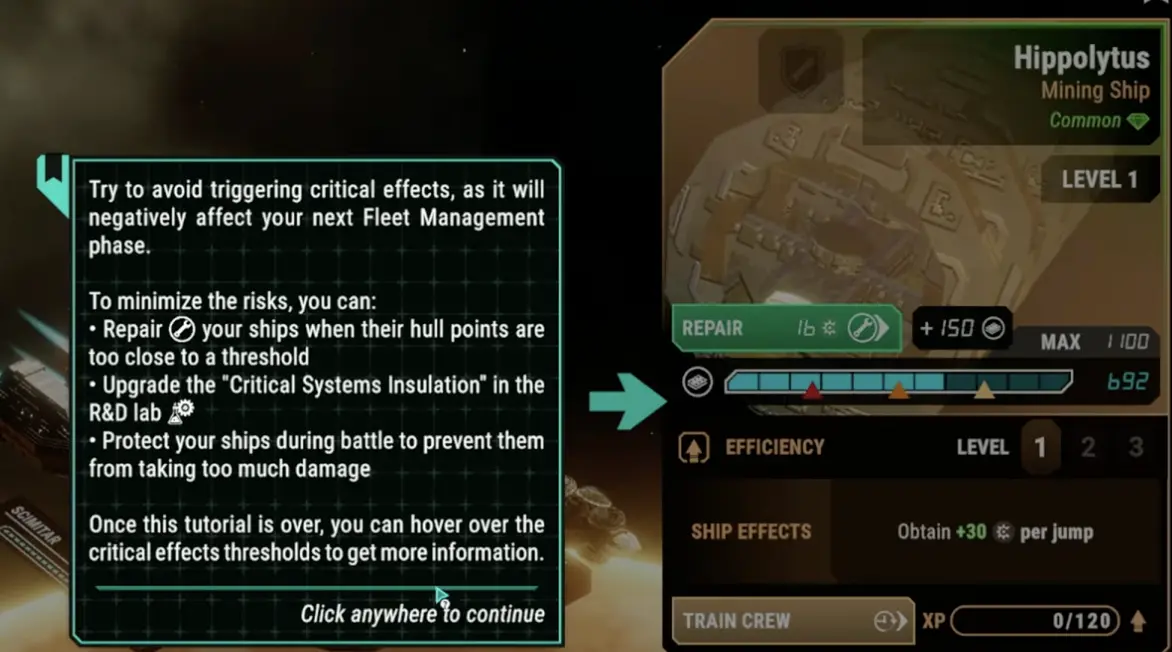
Damaged ships are dangerous because they can create extra consequences after a jump. A ship near a critical threshold is not just low on hull; it is a future situation waiting to happen.
Repair a ship before battle if:
- it is your Gunstar,
- it produces a resource every jump,
- it will be part of civilian defense,
- it has an important fleet effect,
- crossing a threshold would create a negative situation,
- a hero is assigned to a weapon tied to that ship.
You can delay repairs if:
- the ship is not entering battle,
- the ship has no important effect,
- the next fight is low risk,
- you need scrap for an urgent crisis,
- the ship is not near a threshold.
The goal is not to keep every ship perfect. The goal is to keep important ships out of dangerous damage bands.
Civilian ship management
Civilian ships are your economy, your buffer, and sometimes your liability.
They can:
- provide resources per jump,
- increase fleet survival,
- take part in civilian defense,
- trigger problems if damaged,
- become stronger through crew training.
When to train civilian crews
Train a civilian ship when:
- it produces a useful resource,
- it will stay in your fleet for several sectors,
- the timeline is safe,
- no major situation is expiring,
- the extra hull helps it survive defense duty.
Do not train when:
- a crisis is active,
- you need the turn for repairs,
- the ship is too damaged,
- you need Tylium or supplies immediately,
- the payoff will take too long.
Civilian defense
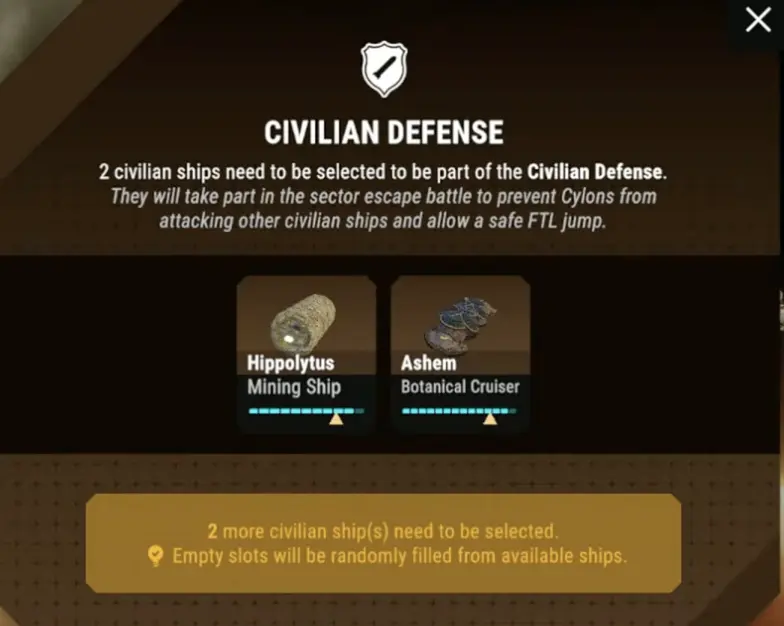
When the game asks you to choose civilian defense ships, you are choosing which ships will be exposed in battle.
Pick ships that:
- have enough hull,
- are not near critical thresholds,
- can survive enemy pressure,
- are not your only source of a key resource,
- can be repaired afterward.
Avoid selecting:
- badly damaged ships,
- fragile resource ships,
- ships you cannot afford to lose,
- ships that would trigger a severe negative effect if damaged.
Sometimes the best defense ship is not the least valuable ship. It is the ship that can survive the job.
Heroes, assignments, and morale
Heroes are not just story characters. They are part of your economy and tactical setup.
Heroes can:
- resolve POIs,
- handle situations,
- improve rewards,
- avoid supply costs,
- gain XP,
- unlock traits,
- improve squadrons,
- improve Gunstar weapons,
- reduce upgrade costs.
Hero assignment rules
Assign heroes based on the current bottleneck.
| Need | Assignment logic |
|---|---|
| More battle damage | Put the right hero on a squadron or weapon. |
| More durable fleet | Use defensive Gunstar or ship-related traits. |
| Cheaper upgrades | Keep R&D cost reduction active before buying. |
| More fuel | Use Tylium or travel traits on fuel POIs. |
| Better crisis handling | Save hero actions for expensive objectives. |
| More morale stability | Avoid repeatedly sacrificing the same key hero. |
Do not assign a hero once and forget them forever. Recheck assignments when your fleet problem changes.
Save one hero action when possible
A common mistake is spending every hero action on early POIs, then opening a crisis with no clean way to pay for its objectives.
Try to keep at least one hero action until:
- the crisis state is clear,
- expiring situations are handled,
- you know which resource is most scarce,
- you know whether a key POI needs a specialist.
Hero morale and personal crises
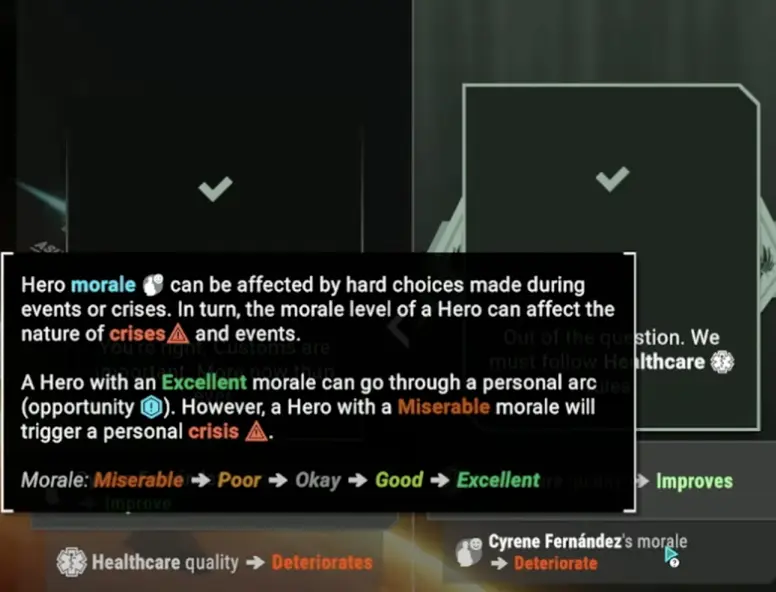
Hero morale is a delayed resource. It may not matter on the turn you lose it, but repeated morale damage can create personal problems later.
Protect morale when:
- the hero is central to your build,
- the morale cost is severe,
- you already have enough supplies,
- the event improves a key relationship,
- a personal crisis would be difficult to handle.
Accept morale loss when:
- Fleet Health or Gunstar hull is at risk,
- supplies are too scarce,
- the hero is not central to your current setup,
- the morale penalty is small,
- the alternative would damage several ships or factions.
The fleet comes first. But if you keep sacrificing the same hero, expect consequences.
Factions: Workers, Military, and Underworld
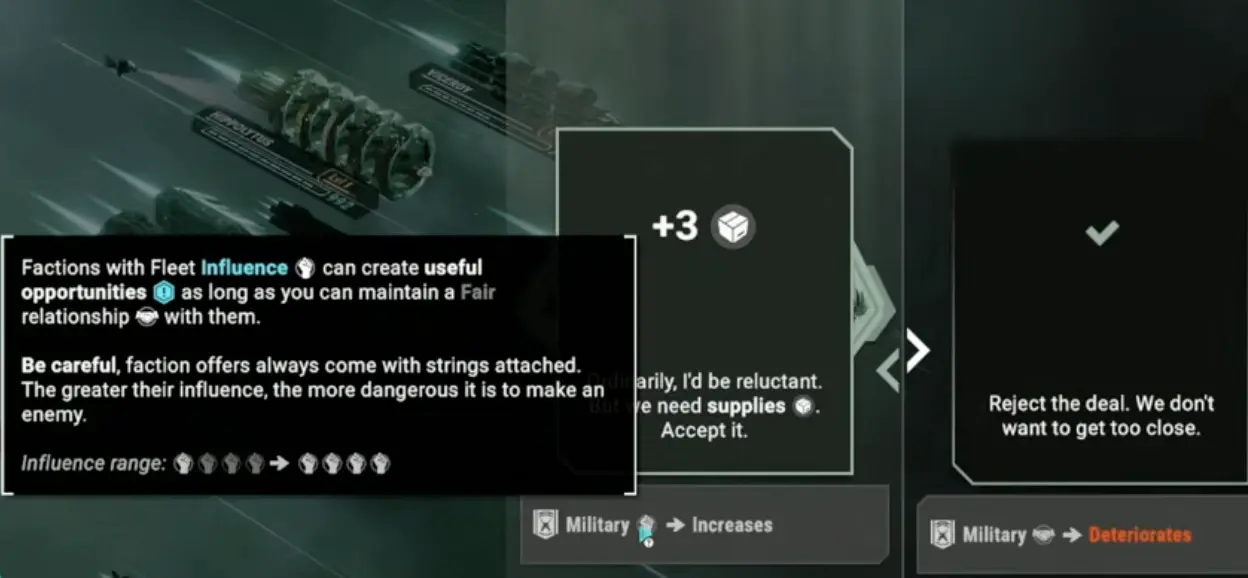
Faction choices are not just flavor. Workers, Military, and Underworld can offer resources, help, or shortcuts, but their influence and relationship changes can create future problems.
How to judge faction offers
Before accepting a faction offer, ask:
- What resource do I gain right now?
- Which faction gains influence?
- Which relationship gets worse?
- Is this a one-time benefit or a long-term political cost?
- Is the fleet desperate enough to accept the downside?
Practical faction example
A common faction-style dilemma looks like this:
| Choice pattern | Immediate result | Possible later problem |
|---|---|---|
| Side with Workers | You may protect production, labor access, or repair capacity. | Military approval may drop, and security-related events may become harder. |
| Side with Military | You may improve order, lockdown, or battle readiness. | Workers may become angry, reducing cooperation or creating unrest. |
| Side with Underworld | You may gain quick supplies, black-market help, or risky shortcuts. | Influence imbalance or future criminal leverage can become a crisis. |
| Compromise / spend resources | You avoid the worst relationship hit. | You lose supplies, scrap, or turns that may be needed elsewhere. |
If an event asks you to choose between dock access, lockdown, worker demands, military security, or black-market relief, do not evaluate only the immediate reward. Ask which faction will become harder to manage two sectors later.
When to accept faction rewards
Accept when:
- the reward solves an immediate crisis,
- the influence change is small,
- your relationship is still stable,
- the reward prevents ship or Fleet Health damage,
- you can handle the future consequences.
Decline when:
- the reward is not needed,
- the faction is already too influential,
- the relationship cost is severe,
- you are creating future faction crises for a small gain.
“Free” supplies are not free if they make the fleet politically unstable.
Faction conflict crises
Avoid invented names for faction crises. The important thing is not the title; it is the penalty.
Faction conflict crises are dangerous because they can:
- lock or weaken civilian ship effects,
- damage faction relationships,
- increase resource costs,
- trigger unrest,
- force you to stockpile or spend specific resources,
- compete with ship repairs and Cylon investigations.
How to handle faction conflict
Use this process:
- Check the bypass penalty.
- Check which faction is involved.
- Check whether civilian ship effects would be locked.
- Check whether the objective is reachable before battle.
- Use POIs, emergency production, or saved scrap if needed.
- Avoid taking faction offers that worsen the same faction imbalance.
If a faction crisis threatens your resource engine, treat it as high priority. If it only causes a small one-time relationship loss, you may be able to ignore it.
Cylon infiltrator guide
The Cylon infiltrator crisis is not a normal one-step situation. It is a long-term investigation system. If you investigate too early, you may waste resources before the suspect pool is useful. If you wait too long, sabotage can drain Fleet Health, damage ships, consume supplies, or create new situations.
The goal is not to accuse everyone.
The goal is to reveal enough clues, identify the primary suspects, then verify guilt before sabotage becomes more expensive than the investigation.
How the investigation works
When the infiltrator system opens, use the security or investigation interface instead of treating it like a normal situation.
| Action | What it does | Cost / limit | Best timing |
|---|---|---|---|
| Investigate | Reveals random undiscovered clues in one clue category. | Confirmed as free once per sector. | Use every sector when available. |
| Interrogate | Reveals one undiscovered clue or verifies one suspicious clue. | Expensive; one observed example cost 15 resources. Cost drops as investigation progress increases. | Use after suspects narrow or when sabotage is becoming too costly. |
| Verify suspicious clue | Confirms whether a suspicious clue proves Cylon guilt. | Uses an interrogation-style paid action if offered. | Best when one or two heroes have several suspicious clues. |
| Brig / detain suspect | Temporarily removes or isolates a suspect if the game offers this option. | Can cost hero availability, morale, or political stability. | Use when resources are too low for clean investigation and sabotage must stop. |
If Investigate is available, use it before spending resources. Free clue progress is the safest way to narrow the field.
How to read suspicious clues
Each hero can have multiple hidden clues. Some are suspicious, some are not. The important pattern is not one clue; it is concentration.
| Suspicion state | What it means | What to do |
|---|---|---|
| One suspicious clue on one hero | Too early to accuse. | Keep tracking. Use free Investigate next sector. |
| Scattered clues across many heroes | Suspect pool is still wide. | Do not spend heavily unless sabotage is already severe. |
| One hero has multiple suspicious clues | This hero is becoming a real suspect. | Consider Interrogate if supplies/resources are healthy. |
| Two heroes stand out as primary suspects | The investigation is becoming actionable. | Spend to reveal or verify clues. |
| Two suspects have several suspicious clues each | This is usually the best window to force a resolution. | Interrogate, verify, or brig before sabotage repeats. |
Do not tunnel on the first suspicious clue. Wait for the pattern.
Investigation timing: early, mid, or late?
| Timing | Pros | Cons | Best use |
|---|---|---|---|
| Early investigation | May reduce sabotage sooner. | Paid actions are inefficient when the suspect pool is wide. | Use free Investigate only, unless sabotage is already severe. |
| Mid investigation | Best balance of evidence and cost. | Requires saving resources. | Best default timing: suspects are narrowing, but sabotage has not snowballed yet. |
| Late investigation | More evidence and cheaper paid actions. | Sabotage may already have cost lives, hull, or supplies. | Use only if you were too poor to act earlier. |
The best default plan is:
- use free Investigate every sector,
- avoid paid Interrogate on weak evidence,
- save supplies/resources for the moment two suspects stand out,
- spend once you can verify a suspicious clue or isolate a likely suspect.
What sabotage can cost
Cylon sabotage can hurt more than one resource.
| Sabotage result | Why it hurts |
|---|---|
| Fleet Health loss | Represents casualties and moves you closer to game over. |
| Ship or system damage | Can push ships below critical thresholds. |
| Supply loss or forced spending | Makes later medical, food, repair, or investigation crises harder. |
| New negative situations | Adds turn pressure next sector. |
| Hero disruption | A suspect may become unavailable, unreliable, or politically dangerous. |
| Morale/faction pressure | Accusations and damage can worsen internal stability. |
The true cost is not one sabotage event. It is the chain reaction: Fleet Health loss, repair costs, expiring situations, and fewer turns for normal preparation.
Investigation decision table
| Situation | Best decision |
|---|---|
| Investigate is free this sector | Use it. There is little reason to skip free clue progress. |
| You have low supplies and only one weak clue | Wait, but save resources. |
| You have low supplies and sabotage is repeating | Spend, brig, or isolate if available. Waiting is now more expensive. |
| You have two strong suspects | Pay to reveal or verify clues. |
| A suspicious clue can be verified | Strong time to spend resources. Verification can end the crisis. |
| The fleet is near death | Stop the sabotage even if the cost hurts. |
| Another crisis expires this turn | Compare penalties. Fix game-over risks first, then investigate. |
| A key hero is a suspect | Do not ignore it because the hero is useful. Confirm or isolate before they cause more damage. |
When to use Brig
Brig is the blunt option. It is useful when you cannot afford a clean investigation or when sabotage is already too damaging.
Use Brig when:
- resources are too low for paid Interrogate,
- suspicion is concentrated on one or two people,
- sabotage is already costing lives or hull,
- the suspect’s temporary loss is survivable,
- you need to stop damage before the next jump.
Avoid Brig when:
- suspicion is scattered,
- the hero is essential for the next crisis or Boss,
- the evidence is weak,
- the morale or political cost would be worse than another investigation step.
Cylon infiltrator priority rule
Do not spend your entire economy on the first suspicious report.
Do not ignore repeated sabotage.
The best window is usually after the suspect pool narrows, but before sabotage has damaged multiple sectors.
How suspicion starts
The infiltrator thread usually begins after the fleet has made several jumps and unexplained damage, sabotage, bombs, or suspicious reports begin to appear.
Watch for:
- sabotage events,
- suspicious hero behavior,
- repeated unexplained resource or ship losses,
- investigation clues,
- “suspicious blot” style records on heroes,
- events that narrow the suspect pool.
One clue does not always mean guilt. Treat early clues as probability, not proof.
How to read suspicious blots
As the investigation progresses, suspicious records help you narrow suspects. A practical rule is:
| Suspicion state | What it means | What to do |
|---|---|---|
| One suspicious clue | Too early to accuse. | Keep tracking. Do not overspend yet. |
| Multiple heroes with scattered clues | Suspect pool is still wide. | Save supplies and keep investigating later. |
| Two or three suspects stand out | Investigation is becoming actionable. | Prepare to spend supplies or use Brig. |
| Two suspects have several suspicious blots | This is usually the best window to force a resolution. | Investigate or brig before sabotage repeats. |
| Sabotage continues after high suspicion | Waiting is now costly. | Stop delaying even if the resource cost hurts. |
If the game narrows the crisis toward two high-suspicion suspects, that is usually your signal to act.
Early investigation vs late investigation
| Timing | Pros | Cons | Best use |
|---|---|---|---|
| Early investigation | May reduce sabotage sooner. | Expensive when the suspect pool is large; can waste supplies. | Use only if you have strong evidence or repeated sabotage already started. |
| Mid investigation | Best balance of evidence and cost. | Requires patience and resource reserve. | Ideal once multiple clues point to a small suspect group. |
| Late investigation | More clues, fewer guesses. | Sabotage may already have cost lives, ships, or resources. | Use only if you were too poor to investigate earlier. |
What sabotage can cost
Cylon sabotage can hurt more than one resource. Depending on the event, it may cause:
| Sabotage result | Why it hurts |
|---|---|
| Fleet Health loss | Represents casualties; this can move you closer to game over. |
| Ship or system damage | May push ships below critical thresholds. |
| Supply loss or forced spending | Makes later medical, food, or repair crises harder. |
| New negative situations | Adds more turn pressure next sector. |
| Hero disruption | A suspect may become unavailable, unreliable, or politically dangerous. |
| Morale/faction pressure | Accusations and damage can worsen internal stability. |
If sabotage repeats, the real cost is not one event. It is the chain reaction: Fleet Health loss, repair costs, expiring situations, and fewer turns for normal preparation.
Investigation cost vs crisis cost
Investigating costs resources, but not investigating costs lives and stability.
Use this decision table:
| Situation | Best decision |
|---|---|
| You have low supplies and only one weak clue | Wait, but save resources. |
| You have low supplies and sabotage is repeating | Investigate or use Brig if the game offers it. Waiting is now more expensive. |
| You have two strong suspects | Spend resources to confirm or isolate one. |
| The fleet is near death | Stop the sabotage even if the investigation cost is painful. |
| Another crisis will expire this turn | Compare penalties. Fix game-over risks first, then investigate. |
| A key hero is a suspect | Do not ignore it because the hero is useful. Confirm or isolate before they cause more damage. |
When to use Brig
Brig is the blunt option. It can be useful when you cannot afford a full investigation, but it has trade-offs.
Use Brig when:
- resources are too low for proper investigation,
- suspicion is concentrated on one or two people,
- sabotage is already costing lives,
- the suspect’s temporary loss is survivable,
- you need to stop damage before the next jump.
Avoid Brig when:
- suspicion is scattered,
- the hero is essential for the next crisis or Boss,
- the evidence is weak,
- the morale or political cost would be worse than another investigation step.
Cylon infiltrator priority rule
Do not spend your entire economy on the first suspicious report.
Do not ignore the crisis after repeated sabotage.
The best window is usually after the suspect pool narrows but before sabotage has damaged multiple sectors.
Gunstar bar and fleet events
The Gunstar bar can provide once-per-sector opportunities, bonuses, morale changes, or special perks.
Use the bar when:
- no urgent situation is expiring,
- you have spare supplies or scrap,
- the reward lasts multiple sectors,
- it improves morale for a key hero,
- it reduces losses or improves combat consistency.
Avoid the bar when:
- a crisis is active,
- you need the turn for repairs,
- you are low on the resource it costs,
- the bonus does not solve your current problem.
A strong bar event can be worth a turn. A random bar event before a crisis can be a trap.
Every-sector checklist
Use this once after every jump and again before starting combat.
| Check | What to do |
|---|---|
| Critical thresholds | Repair Gunstar, resource ships, and civilian defense candidates first. |
| Fleet Health | Avoid optional Fleet Health losses if already low. |
| Cylon infiltrator | Check for new clues, sabotage, or narrowed suspects. |
| Faction state | Look for influence imbalance or relationship collapse. |
| Tylium | Make sure you can still jump and route properly. |
| Supplies | Keep enough for crisis, repairs, medical, or investigation steps. |
| Scrap | Decide between repair, R&D, or saving. |
| Hero actions | Save at least one if the sector is not fully understood. |
| Hero assignments | Move heroes to useful squadrons, weapons, R&D, or POIs. |
| Squadron status | Repair or level your core squadrons. |
| Civilian defense | Choose ships that can survive exposure. |
| POIs | Take only the POIs that solve a current shortage or advance a key objective. |
Do not click rewards immediately after a jump. Check the fleet first.
Common fleet management mistakes and fixes
| Mistake | Why it hurts | Fix |
|---|---|---|
| Fixing every situation | You run out of resources before real crises. | Compare cost vs penalty first. |
| Taking every POI | You waste Tylium and turns. | Take only POIs that solve a shortage or advance a key objective. |
| Spending all hero actions early | You cannot handle expensive crisis steps. | Keep one hero available until the sector is clear. |
| Ignoring ship thresholds | Damaged ships create new negative situations. | Repair important ships before battle. |
| Overtraining civilian ships | You spend turns while crises expire. | Train only when the timeline is safe. |
| Ignoring civilian ship training | Your economy never scales. | Train resource ships when the sector is stable. |
| Accepting every faction offer | Influence and relationships become unstable. | Accept rewards only when the downside is manageable. |
| Sacrificing morale repeatedly | Heroes may trigger personal crises. | Protect key heroes when the cost is reasonable. |
| Buying upgrades before repairs | You enter battle with damaged ships. | Repair critical ships first. |
| Investigating the Cylon too early | You spend supplies before the suspect pool is useful. | Wait for stronger clues unless sabotage is already severe. |
| Investigating the Cylon too late | Repeated sabotage drains lives, ships, and resources. | Act once suspects narrow or sabotage repeats. |
| Hoarding resources forever | The fleet dies with unused supplies or scrap. | Spend when the penalty would be worse than the cost. |
FAQ
Should I solve every situation in Scattered Hopes?
No. Fix the situations that threaten Fleet Health, Gunstar hull, critical thresholds, or long-term resource generation. Ignore small one-time penalties when resources are scarce.
How do I find the Cylon infiltrator?
Use free Investigate actions every sector, track suspicious clues, wait until the suspect pool narrows, then spend resources to Interrogate or verify suspicious clues. If sabotage is already severe and resources are low, use Brig if available.
Should I investigate the Cylon early or late?
Usually neither extreme. Use free investigation early, but save expensive actions until the mid-stage, when two or three suspects stand out and paid verification is more likely to end the crisis.
When should I buy R&D upgrades?
Buy R&D when your fleet is stable and the upgrade solves a repeated problem. Do not buy upgrades while the Gunstar, resource ships, or civilian defense ships are near critical thresholds.
Continue Reading in the Battlestar Galactica Guide Cluster
This article is part of our Battlestar Galactica strategy cluster. Use these guides to keep learning the game's core systems and routes.
Complete combat guide for BSG: Scattered Hopes. Master FTL jumps, tactical pause, flak, nukes, and squadron tactics to defeat Cylon bosses like The Clerk.
Build GuideBest Early Upgrades & Squadrons: BSG Scattered HopesGuide to the best early upgrades and squadrons in BSG: Scattered Hopes. Learn Viper Mk.2 vs Mk.7 tactics, Raptor builds, resource economy, and Boss prep.
Progression GuideMeta Progression & Favors Guide: BSG Scattered HopesMaster meta progression in BSG: Scattered Hopes. Learn how to earn Fate Points, unlock Favors and fleets, conquer Trials, and what to upgrade first.