Battlestar Galactica Guide
Combat & Boss Guide: BSG Scattered Hopes
Complete combat guide for BSG: Scattered Hopes. Master FTL jumps, tactical pause, flak, nukes, and squadron tactics to defeat Cylon bosses like The Clerk.
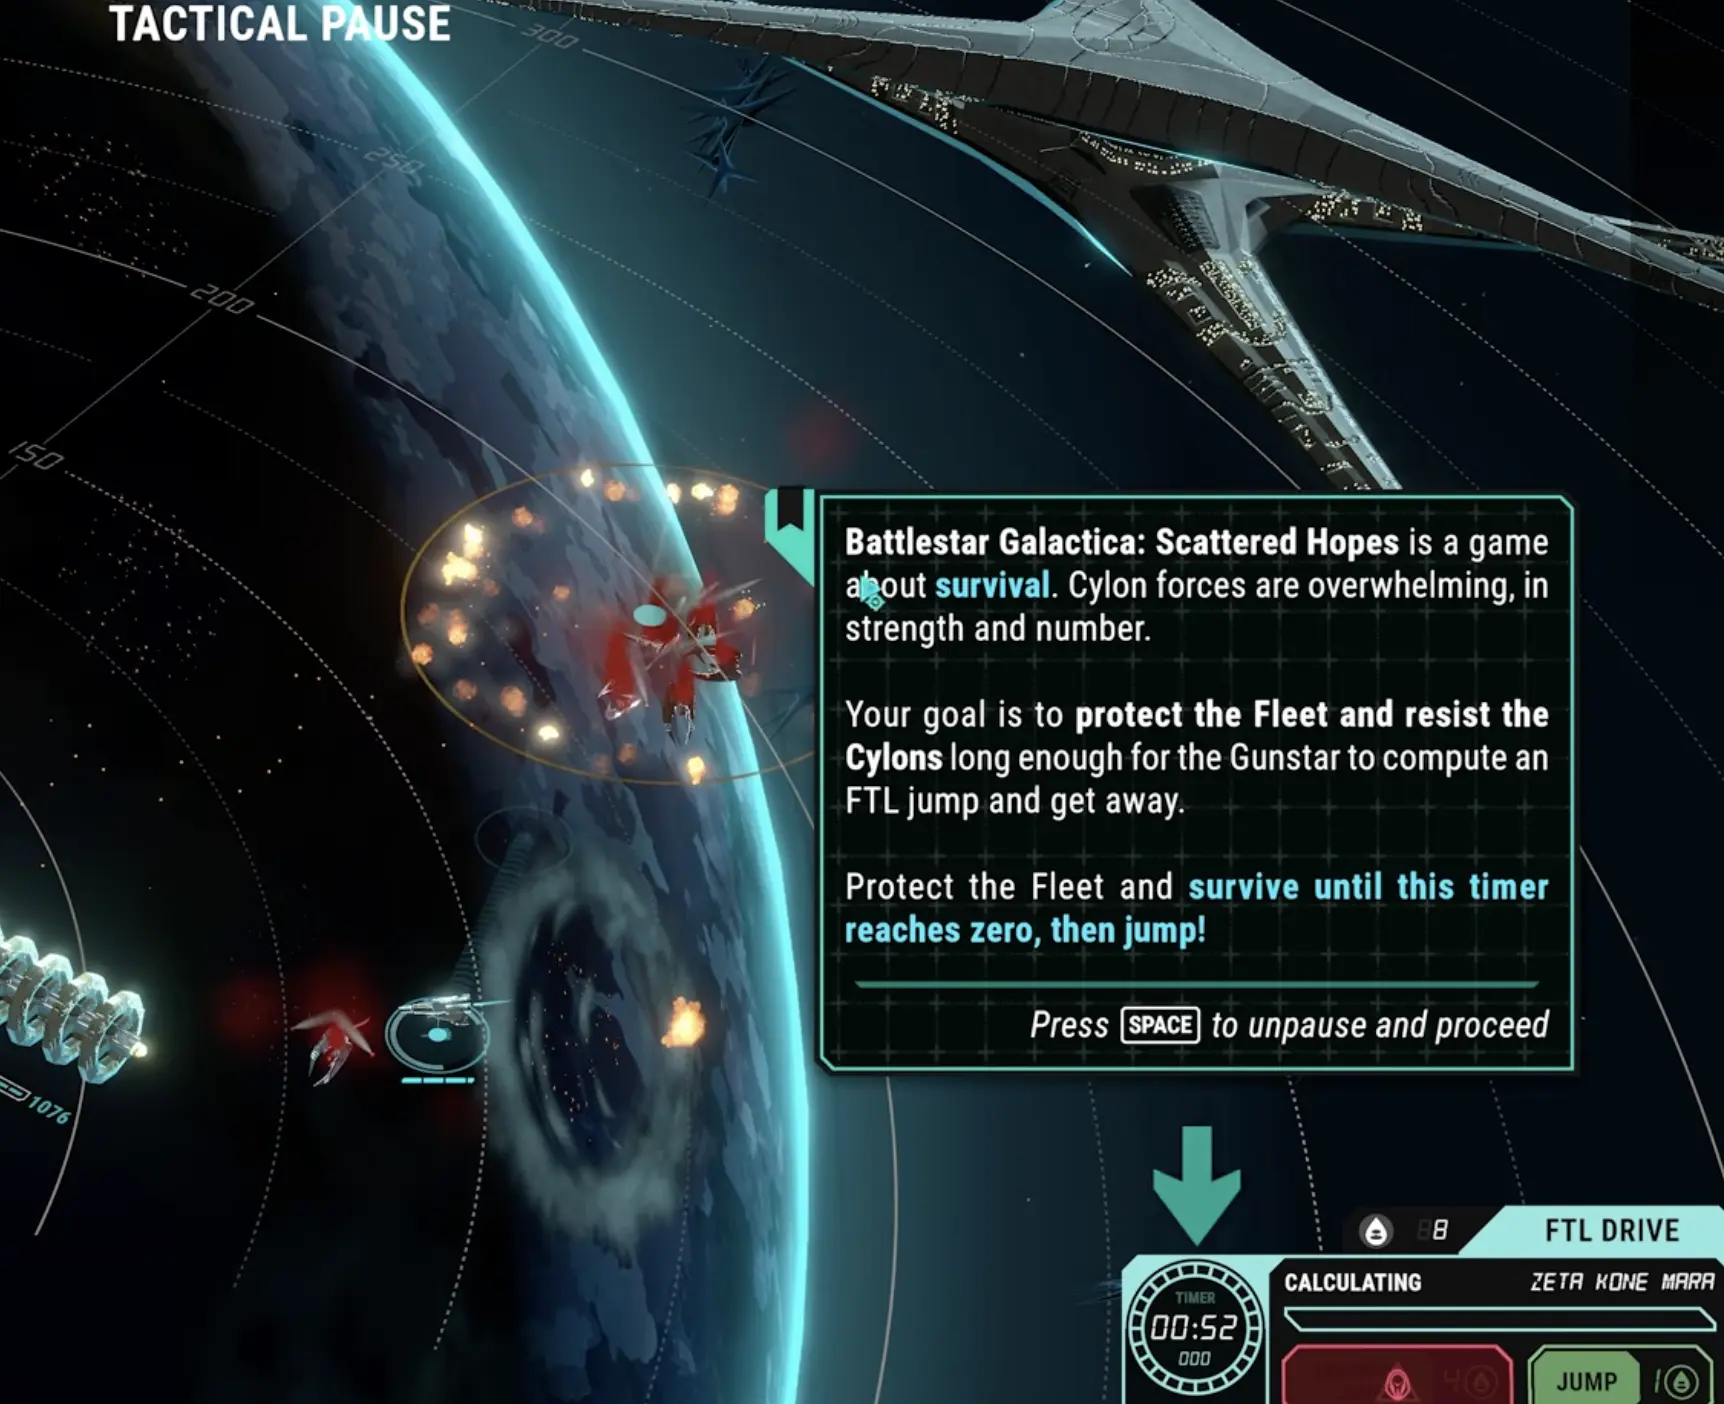
Combat in Battlestar Galactica: Scattered Hopes is not about wiping out the Cylon fleet. Most battles are escape battles. Your goal is to hold the line long enough for the FTL calculation, protect the ships that matter, recall your squadrons, and jump before the battlefield becomes impossible.
The safest combat mindset is:
Kill only what threatens the fleet. Do not chase what does not stop your jump.
Combat objective: survive until FTL
In most early battles, you are not supposed to destroy everything. You are supposed to survive until the FTL timer finishes.
That changes how you fight.
| Normal RTS thinking | Scattered Hopes thinking |
|---|---|
| Clear every enemy. | Survive until FTL. |
| Chase weak enemies. | Stay near the fleet. |
| Use all damage immediately. | Save tools for priority threats. |
| Push forward when winning. | Pull back when FTL is close. |
| Keep units fighting until the end. | Recall squadrons before jumping. |
If the FTL timer is almost ready and a group of enemies is far from the fleet, stop chasing. Pull back. A clean jump is worth more than a few extra kills.
The 2-minute combat timeline
Most standard escape battles revolve around a short FTL countdown. Think of the fight in three phases.
| Time window | Main goal | What to do |
|---|---|---|
| 0:00–0:30 | Deploy and read the fight | Place Raptors, send Vipers to early Dradis contacts, check enemy ship modifiers, avoid overcommitting. |
| 0:30–1:30 | Control the pressure | Kill nukes, boarders, missiles, snipers, and heavy raiders. Use flak on grouped waves. Save nukes unless the line is breaking. |
| 1:30–2:00 | Prepare the exit | Stop chasing distant enemies, recall damaged or far squadrons, keep one weapon ready, jump when safe enough. |
The last 30 seconds are usually the most dangerous because you are tempted to keep fighting while your squadrons are already too far away. Start thinking about recall before the FTL button is ready.
Beginner combat flow
If you feel overwhelmed, use this flow for every standard battle:
- Deploy your main squadrons and Gunstar weapons.
- Put the Raptor in a wide coverage position.
- Keep the Viper mobile near the first wave.
- Pause on every Dradis preview.
- Kill nukes, boarders, and dangerous missiles first.
- Use flak on grouped low-hull enemies.
- Use your own nuke only if the wave will break your line.
- At about 30 seconds left, stop overextending.
- Recall damaged or distant squadrons.
- Jump as soon as FTL is ready and the fleet is safe enough.
This flow will not solve every Boss fight, but it prevents most beginner combat losses.
Use tactical pause constantly
Tactical pause is your main combat tool. Do not treat it like an emergency button. Treat it like the normal way to play.
Pause whenever:
- a Dradis preview appears,
- a missile launches,
- a nuke appears,
- a heavy raider enters the field,
- a boarder targets a ship,
- a civilian ship is under attack,
- a squadron drifts too far away,
- the FTL timer is nearly ready.
During pause, ask three questions:
- What is the most dangerous thing on screen?
- Which squadron or weapon can stop it fastest?
- Should I keep fighting or prepare to jump?
If you only pause after damage lands, you are pausing too late.
Read Dradis previews before enemies spawn
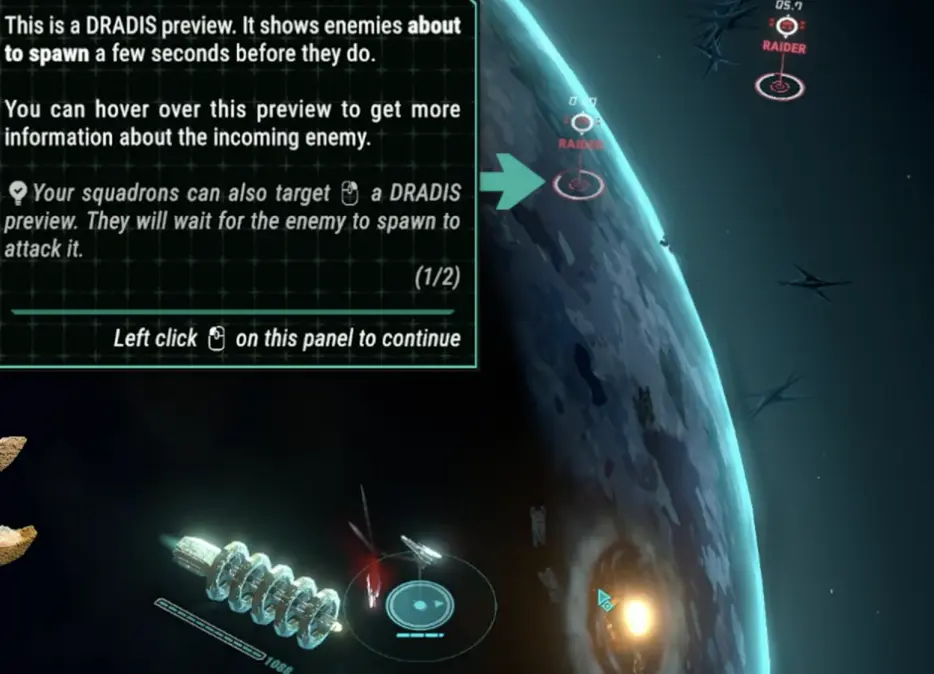
Dradis previews show incoming enemies before they fully arrive. This is your warning window.
Use that time to:
- hover the incoming contact,
- check enemy type,
- pre-position a squadron,
- target the preview before the enemy spawns,
- prepare flak if a group is coming,
- keep a squadron near the fleet if the wave is split.
Do not wait for enemies to reach your ships. The best interception happens before the enemy is fully active.
Dradis response table
| If the preview shows… | Do this |
|---|---|
| Small raider group | Send Viper or set up flak if clustered. |
| Scattered enemies | Position Raptor early to cover the lane. |
| Missile | Move or target an interceptor before it gets close. |
| Nuke | Stop what you are doing and kill the nuke first. |
| Heavy raider | Use focused squadron damage, burst, or a nuke if several arrive together. |
| Boarder | Focus immediately before it reaches a civilian ship. |
| Sniper / artillery | Send a fast unit to close distance. |
Viper role: fast interception
The Viper is your first answer to fast threats. It is quick, flexible, and good at chasing enemies that would otherwise slip through your defense.
Use Vipers to:
- intercept raiders,
- chase snipers,
- hit missiles,
- kill nukes,
- finish damaged enemies,
- reach Dradis contacts before they spread,
- cover the side your Raptor cannot reach.
Vipers should move aggressively, but not recklessly. If a Viper chases too far, it may miss the next wave or fail to return before FTL.
Hunter Instinct
Vipers can use Hunter Instinct to automatically chase targets in range. It is useful for cleaning up small raider packs, but it should not decide the battle for you.
Keep it active for routine cleanup. Take manual control when:
- a nuke appears,
- a boarder spawns,
- a sniper needs to die,
- the Viper is chasing too far,
- the Viper is taking damage,
- FTL is almost ready.
Beginner rule:
Hunter Instinct is for cleanup. Manual targeting is for run-ending threats.
Raptor role: long-range coverage
The Raptor is slower than the Viper and needs good positioning. If you drag it around constantly, it loses value.
Use Raptors to:
- cover wide lanes,
- shoot enemies before they reach the fleet,
- support the Viper from behind,
- hold one side while the Viper handles another,
- soften targets before they enter the danger zone.
A Raptor should usually be placed where it can cover multiple incoming paths. If it is always arriving after enemies already hit your ships, you are using it too reactively.
Good Raptor positioning
Good Raptor positioning means:
- place it before the wave spawns,
- keep it behind or near the fleet,
- cover the largest enemy approach angle,
- avoid sending it alone into danger,
- let the Viper chase while the Raptor anchors the defense.
Wolf role: tanking and taunt
The Wolf is useful when enemies pressure your fleet directly. It can soak damage and pull attention away from fragile targets.
Use Wolves when:
- enemies are reaching civilian ships,
- you need a ship to hold a lane,
- your Viper is too fragile to tank,
- your Raptor needs protection,
- boarders or focused attackers need to be pulled away.
Do not send the Wolf too far away from the fleet unless you know why. Its value is strongest when it changes who the enemy is attacking.
Gunstar weapons: flak and nukes
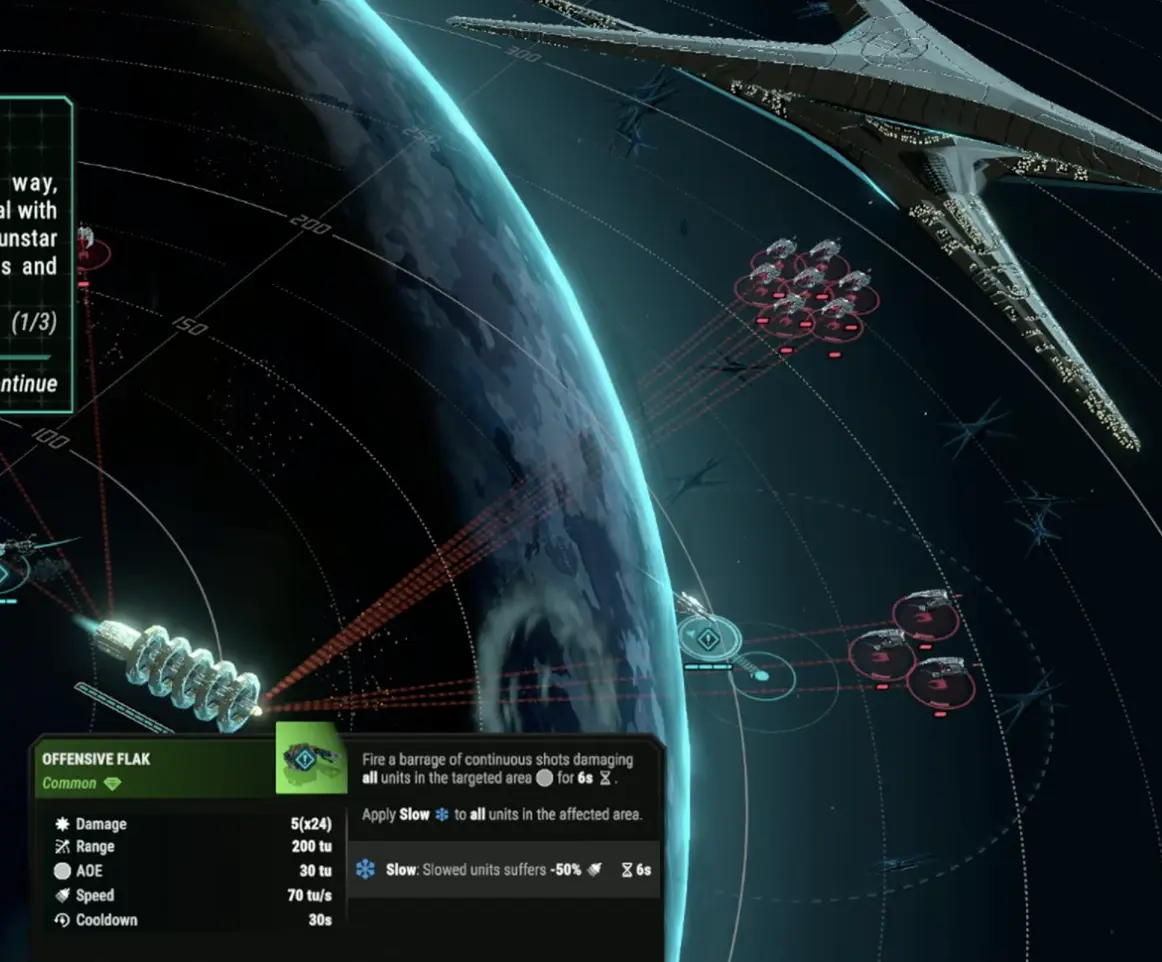
Gunstar weapons are how you solve problems your squadrons cannot handle alone.
Offensive flak
Flak is best against:
- grouped low-hull enemies,
- enemies flying through a predictable path,
- waves too dense for one squadron,
- small enemies close enough to overlap in the target area.
Do not waste flak on a single target unless that target is about to cause serious damage. Flak is strongest when it covers an area.
Nuke launcher
Your own nukes are emergency tools. They are powerful, but limited and slow.
Use your nuke when:
- heavy raiders are breaking through,
- a dense wave is about to hit civilian ships,
- you need to clear space before FTL,
- a dangerous group is too far for flak,
- the Gunstar is about to take critical damage.
Do not spend a nuke on a wave your Viper and Raptor already control.
Enemy missiles and nukes
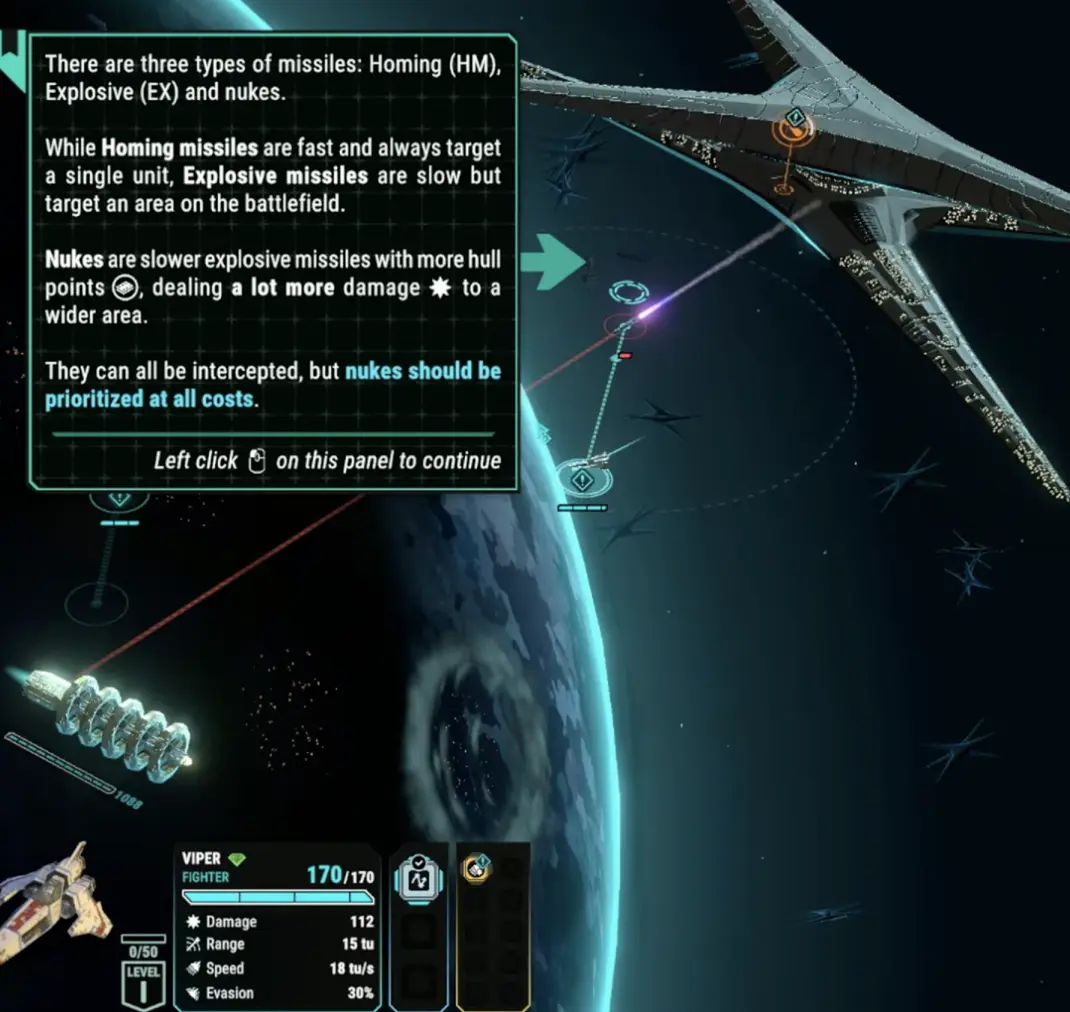
Enemy missiles can be managed. Enemy nukes must be respected.
| Threat | What to do |
|---|---|
| Homing missile | Intercept if it is aimed at a key ship. |
| Explosive missile | Keep squadrons away from the blast path and intercept if needed. |
| Nuke | Prioritize immediately. Do not let it reach the fleet. |
When a nuke appears, pause and retarget. Do not let Hunter Instinct or current orders keep your squadrons on lower-priority enemies.
Nuke priority rule
If a nuke is moving toward your fleet, it becomes the top target unless another threat would instantly destroy the Gunstar.
Do this:
- pause,
- identify the nuke path,
- send the fastest unit,
- support with another squadron if needed,
- keep fragile units out of the blast,
- resume only when the nuke is handled.
Heavy raiders
Heavy raiders have enough hull that light area damage may not stop them in time. Do not assume flak alone will solve them.
Good answers to heavy raiders:
- focus fire with Viper and Raptor,
- use a strong single-target ability,
- deploy a nuke if several heavy threats arrive together,
- use Wolf to tank if they are already close,
- intercept them early before they reach the fleet.
If you notice heavy raiders only when they are already inside the fleet, you are late. Read the preview and assign damage early.
Snipers and artillery
Snipers and artillery punish passive play. They can damage you from range while your fleet is busy with closer enemies.
Counter them with:
- Vipers,
- fast abilities,
- early Dradis targeting,
- flanking movement,
- quick focus fire.
Raptors can help if they are already positioned, but a slow response gives snipers too much time to work.
Boarders are high priority
Boarders are dangerous because they can create problems that continue after combat. If a boarder reaches a civilian ship or key fleet asset, you may have to deal with a major issue in the fleet management phase.
When you see a boarder:
- pause immediately,
- check its target,
- focus it with multiple squadrons,
- use flak or abilities if it is in a group,
- do not let it touch civilian ships.
A boarder may look less explosive than a nuke, but the long-term damage can be just as bad.
Enemy Cylon ship modifiers
Some battles are not defined only by the squadrons on screen. The enemy capital ship or Gunstar can change the rules of the fight.
Watch for enemy modifiers such as:
| Enemy modifier | Why it changes the fight | How to respond |
|---|---|---|
| Minefields | Punishes careless movement and automatic chasing. | Turn off reckless pursuit, move squadrons manually, fight closer to the fleet. |
| Missile hijacking | Colonial missiles can be punished if fired too close or at the wrong angle. | Do not fire nukes or missiles blindly. Check the modifier first and use squadrons/flak if missile weapons are risky. |
| Shielding / protector units | Priority targets survive longer than expected. | Kill protector/support enemies before dumping burst damage into the wrong target. |
| Sniper or turret support | You take constant chip damage while handling normal waves. | Send Vipers or long-range Raptors early; do not wait until the fleet is already damaged. |
| Focused attackers | Some enemies may keep their original target even after being attacked. | Use taunt only if the tooltip says it works; otherwise kill or body-block the threat quickly. |
Before every fight, check the enemy ship modifier. If you lose a fight that felt unfair, the modifier was probably the reason.
Protect civilian ships
Civilian ships are part of your economy and survival plan. If they take too much damage, you can lose resource production, trigger critical effects, or create new negative situations after the battle.
To protect civilian ships:
- keep one squadron near the fleet core,
- do not chase every enemy to the edge of the map,
- intercept missiles before they cross the center,
- kill boarders immediately,
- use Wolf or taunt effects to redirect pressure,
- recall damaged squadrons instead of letting them die outside.
If a civilian ship produces Tylium, supplies, or scrap each jump, treat it as a long-term upgrade. Protect it like one.
When to use emergency jump
Emergency Jump is a panic button, not your normal exit plan.
In standard battles, Emergency Jump can let you leave early, but it costs extra Tylium. One early run example shows a normal jump costing 1 Tylium while an Emergency Jump costs 4 Tylium. Exact costs can vary by situation, but the practical lesson is the same: Emergency Jump spends fuel to save hull, ships, or the run.
Use Emergency Jump when:
- the Gunstar is about to die,
- a civilian ship you cannot afford to lose is about to be destroyed,
- your squadrons are wrecked or out of position,
- a large wave is arriving and you cannot stop it,
- staying ten more seconds would trigger a run-ending loss.
Avoid Emergency Jump when:
- the normal FTL timer is almost ready,
- the remaining enemies are far away,
- your defense is stable,
- you only want to skip cleanup,
- you are already low on Tylium and can still survive normally.
Important: Emergency Jump is not always available. Boss battles and some special encounters can disable it, so do not build your whole plan around escaping early.
Recall squadrons before FTL
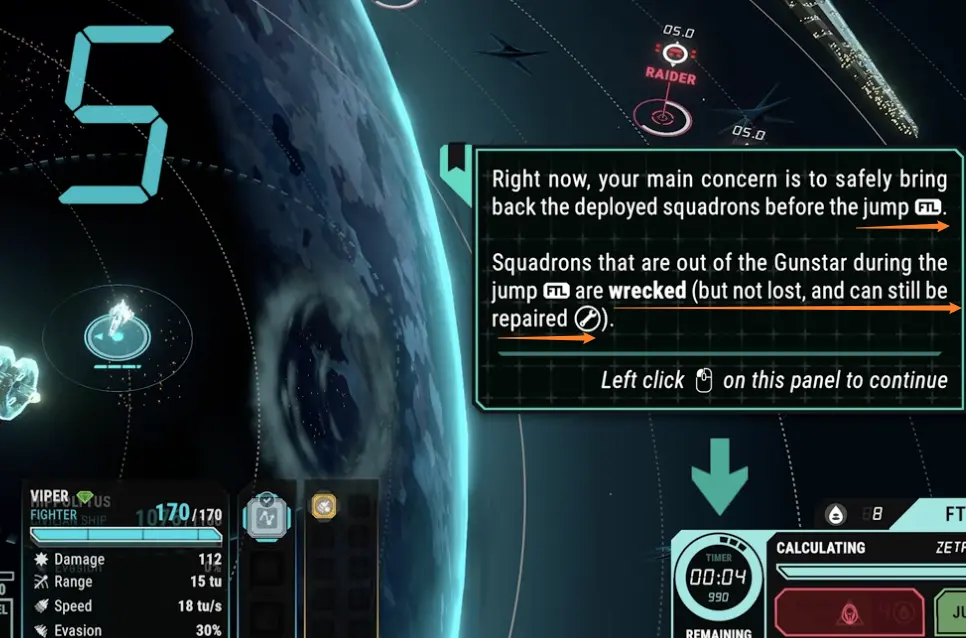
When FTL is nearly ready, stop pushing outward. Start pulling your squadrons back toward the Gunstar.
Recall when:
- the FTL timer is almost finished,
- the current wave is under control,
- a squadron is far from the fleet,
- a squadron is damaged,
- the next enemy wave is too far to matter,
- your only goal is to leave safely.
Squadrons left outside during the jump can be wrecked. They may not be permanently lost, but repairing them costs resources you need for the next sector.
Safe FTL exit sequence
Use this sequence near the end of a battle:
- Pause at the last 20–30 seconds.
- Kill or intercept the closest immediate threat.
- Stop chasing distant enemies.
- Recall damaged or far squadrons.
- Keep one weapon ready in case a missile appears.
- Jump as soon as FTL is ready and the fleet is safe enough.
Do not wait for a perfect battlefield. The perfect battlefield usually never comes.
Target priority list
Use this target priority when combat becomes chaotic.
| Priority | Target | Reason |
|---|---|---|
| 1 | Nukes | Massive damage if ignored. |
| 2 | Boarders | Can create severe strategic problems after battle. |
| 3 | Missiles about to hit key ships | Fast damage that punishes delay. |
| 4 | Heavy raiders near the fleet | Too tough for weak damage alone. |
| 5 | Snipers / artillery | Long-range pressure that chips you down. |
| 6 | Protector / support enemies | They can make the real target hard to kill. |
| 7 | Focused attackers on civilian ships | They can force bad repairs later. |
| 8 | Basic raider groups | Dangerous in numbers, but manageable. |
| 9 | Far enemies when FTL is ready | Usually not worth chasing. |
Boss battles: how Basestars are different
After several sectors, the run escalates into a Boss Basestar fight. These are not normal escape battles.
Boss battles are different because:
- the enemy Basestar has much more health,
- the fight usually has a unique rule or modifier,
- Emergency Jump may be disabled,
- the pressure starts faster,
- civilian ships are more likely to take critical damage,
- you need a plan before the battle starts.
The three major Boss encounters are:
| Boss | Basestar | What to expect |
|---|---|---|
| Nº5 The Clerk | Polyphemus | Early Boss pressure, hacking, missile/nuke pressure, no easy escape. |
| Nº3 The Philosopher | Sphinx | Heavier mid-run pressure, support/protector problems, punishes weak damage. |
| The Minister | Hyperion | Late-run Boss pressure; prepare for the hardest version of your survival plan. |
Do not enter a Boss sector like a normal fight. Repair first, assign heroes, stock nukes if possible, and make sure your squadrons are healthy.
How to beat The Clerk
The Clerk is the first major Boss wall for many players. The mistake is treating it like a normal two-minute escape fight where you can leave if things go badly.
Against The Clerk:
- Assume Emergency Jump may be disabled.
- Bring at least one fast interceptor.
- Save burst damage for nukes, snipers, and heavy waves.
- Do not chase the Basestar if the fleet is exposed.
- Use flak for clustered enemies, not isolated targets.
- Keep one squadron close enough to defend civilian ships.
- Recall before the final seconds if the battle allows a jump/exit.
The Clerk is dangerous because he compresses the fight. You can be dealing with nukes, strikers, snipers, and a large wave before your normal rhythm settles. Pause more often than usual.
The Clerk preparation checklist
Before fighting The Clerk, try to have:
| Preparation | Why it matters |
|---|---|
| Repaired Gunstar hull | You may not be able to escape early. |
| Repaired civilian defense ships | They are likely to take pressure. |
| Viper or fast interceptor | Nukes and snipers must die quickly. |
| Raptor or long-range coverage | You need help on split waves. |
| Flak | Clustered raiders need area control. |
| At least one emergency nuke or burst tool | Heavy waves can break the line. |
| Heroes assigned to active combat roles | Boss fights punish wasted bonuses. |
If you are losing to The Clerk, the answer is usually not “more damage into the Basestar.” It is better target priority and fewer leaks into your civilian ships.
The Philosopher and later Bosses
Later Bosses punish builds that only survived early sectors by improvising.
Against The Philosopher and later Basestars, look for the fight’s special rule first:
| If the Boss fight has… | Your adjustment |
|---|---|
| Protector or shield support | Kill support before spending burst on the main target. |
| Minefields | Move manually and stop automatic chasing through danger zones. |
| Missile hijacking | Be careful with Colonial missiles and nukes. Use squadrons/flak if missile weapons are risky. |
| Heavy sniper pressure | Send fast units early; do not let ranged enemies stack free damage. |
| Dense late waves | Save nukes and flak for the final pressure window. |
| No Emergency Jump | Play conservatively from the start; there is no panic exit. |
The later the Boss, the more important pre-battle preparation becomes. If you arrive with damaged squadrons, low Tylium, no nukes, and civilian ships near critical thresholds, the fight may already be lost.
Boss fight target priority
Use this order in Boss battles:
| Priority | Target | Why |
|---|---|---|
| 1 | Nukes | They can decide the fight immediately. |
| 2 | Boarders | They create long-term damage even if you survive. |
| 3 | Protector / shield / support units | They make everything else harder to kill. |
| 4 | Snipers / artillery | Free damage over time is deadly in Boss fights. |
| 5 | Heavy raiders near civilian ships | They force repairs and critical effects. |
| 6 | Missile threats | Intercept if aimed at key ships. |
| 7 | Basestar damage windows | Attack when your fleet is safe enough. |
| 8 | Basic raiders | Clear with flak or spare squadron time. |
Beginner mistake: attacking the Basestar while nukes, supports, or snipers are still active. Boss damage only matters if your fleet survives the wave.
Common combat mistakes and fixes
| Mistake | Why it hurts | Fix |
|---|---|---|
| Chasing every enemy | Squadrons leave the fleet exposed. | Fight near the fleet unless a priority threat must be intercepted. |
| Not using tactical pause | You react too late to missiles and split waves. | Pause every time a new contact appears. |
| Ignoring Dradis previews | Enemies reach the fleet before you respond. | Target previews and pre-position units. |
| Moving Raptors constantly | They lose firing time and arrive late. | Place them early in wide coverage lanes. |
| Saving nukes forever | Heavy waves break through and damage ships. | Use nukes when they prevent critical damage. |
| Wasting nukes early | You have no answer to dangerous waves later. | Save nukes for dense, heavy, or emergency waves. |
| Letting boarders through | You create major follow-up problems. | Focus boarders immediately. |
| Forgetting squadron recall | Squadrons get wrecked during FTL. | Recall before the jump button is ready. |
| Waiting for full map clear | The Cylon force keeps scaling pressure. | Jump once the fleet is safe enough. |
| Ignoring enemy ship modifiers | The battle rules change without you adapting. | Check the modifier before spending nukes or overextending. |
| Treating Boss fights like normal fights | Emergency Jump may be disabled and pressure is higher. | Repair, assign heroes, and bring burst before entering. |
FAQ
Do I need to kill every enemy in Scattered Hopes?
No. In escape battles, you need to survive until FTL is ready. Killing enemies is only useful when it protects the fleet or buys time.
What should I target first?
Target nukes first, then boarders, then missiles near key ships, then heavy raiders, snipers, or support units depending on what is threatening the fleet.
How do I beat The Clerk?
Prepare before entering the Boss sector. Repair your Gunstar and civilian defense ships, bring a fast interceptor, save burst tools for nukes and snipers, and do not waste time chasing the Basestar while your fleet is exposed.
When should I use my own nuke?
Use your own nuke when a heavy or dense wave would cause critical damage. Do not waste it on small waves that squadrons or flak can handle.
Why does my Raptor feel weak?
You are probably moving it too often or placing it too late. Raptors need early positioning and wide firing lanes.
When should I emergency jump?
Use Emergency Jump when staying would cost the Gunstar, a key civilian ship, or the entire run. It costs extra Tylium and may be disabled in Boss or special encounters.
Why did my squadron get wrecked after FTL?
It was likely outside the Gunstar during the jump. Recall squadrons before triggering FTL whenever possible.
Continue Reading in the Battlestar Galactica Guide Cluster
This article is part of our Battlestar Galactica strategy cluster. Use these guides to keep learning the game's core systems and routes.
Master crisis and fleet management in BSG: Scattered Hopes. Learn to handle resources, Cylon infiltrators, faction politics, morale, and civilian ships.
Build GuideBest Early Upgrades & Squadrons: BSG Scattered HopesGuide to the best early upgrades and squadrons in BSG: Scattered Hopes. Learn Viper Mk.2 vs Mk.7 tactics, Raptor builds, resource economy, and Boss prep.
Progression GuideMeta Progression & Favors Guide: BSG Scattered HopesMaster meta progression in BSG: Scattered Hopes. Learn how to earn Fate Points, unlock Favors and fleets, conquer Trials, and what to upgrade first.