Thick As Thieves Game Guide
Thick As Thieves Game: How to Unlock Chameleon
Learn how to unlock Chameleon in Thick As Thieves Game, where to check the Wardrobe, what counts as guild progress, and what to do before and after Chameleon unlocks.
Thick As Thieves Game: How to Unlock Chameleon
Chameleon is locked at the start of Thick As Thieves Game. The confirmed unlock path is guild progression: complete guild contracts, earn favor with the Thieves Guild, then return to the Thief’s Den and check the Wardrobe / Customize Loadout screen.
The important player-facing milestone is after early guild contract progression. If Chameleon is still locked, keep completing active guild contracts rather than replaying the tutorial or buying random cosmetics.
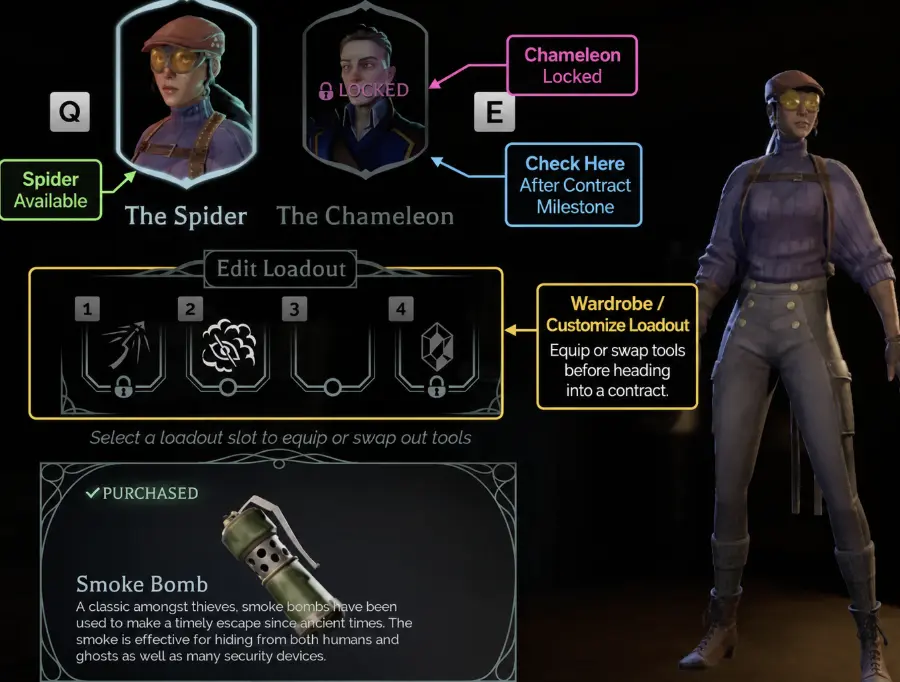
Chameleon appears in the loadout / customization screen but is locked early. The unlock is tied to guild progression, not the tutorial replay.
Fast Answer
| Question | Answer |
|---|---|
| How do you unlock Chameleon? | Complete guild contracts and earn favor with the Thieves Guild. Check the Wardrobe / Customize Loadout screen after contract milestones. |
| When should I start checking? | Start checking after each new guild contract chain, especially around the reported 8th contract milestone. |
| Where do I check Chameleon? | In the Thief’s Den, go to the Wardrobe / Customize Loadout screen. |
| Is Chameleon bought from the Black Market? | The Black Market can show Chameleon cosmetics, but the character unlock path is guild favor / contract progression. |
| Should I replay the tutorial? | No. Progress through new guild contracts instead. |
| Is Spider bad before Chameleon unlocks? | No. Spider is the best early learning character because mobility helps you recover from bad routes. |
Read next:
Current Unlock Requirement
The cleanest current answer is:
Unlock Chameleon by progressing through guild contracts and earning favor with the Thieves Guild. Check the Wardrobe after major contract milestones.
Do not treat these as unlock triggers:
- replaying the tutorial;
- looting more random valuables in an already completed run;
- buying Chameleon cosmetics before the character is available;
- changing Spider’s outfit;
- switching tools in the Wardrobe.
Those systems can help progression, money, and customization, but they are not the same as unlocking Chameleon.
The Unlock Loop
The Chameleon unlock path runs through the Thief’s Den loop:
- Answer the Electrogram when the guild contacts you.
- Check the Ledger for the next guild contract.
- Prepare tools and map access through the Black Market / Wardrobe.
- Complete the contract objective and return safely.
- Return to the Thief’s Den.
- Check the Wardrobe / Customize Loadout screen for Chameleon.
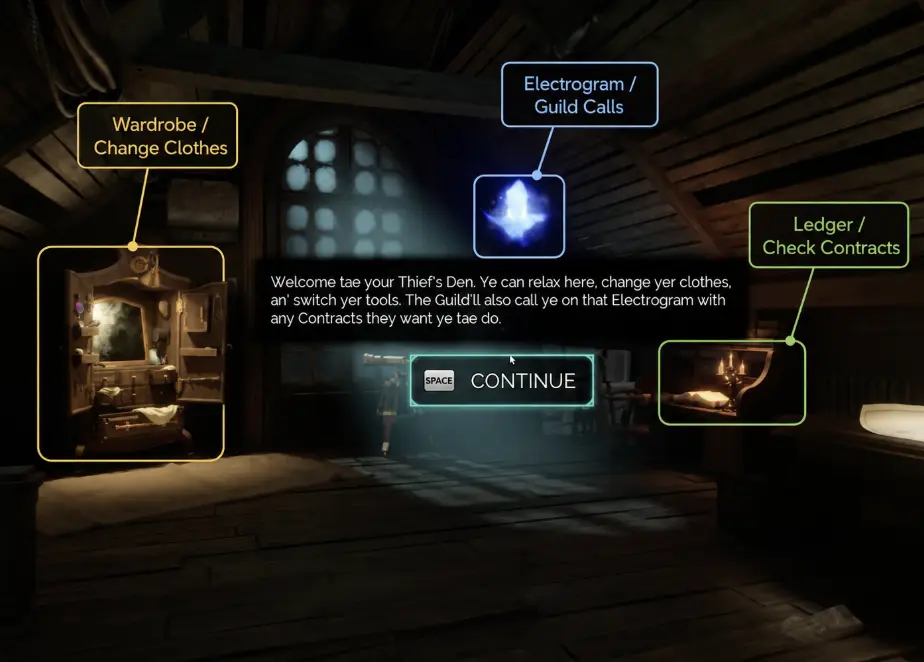
The Thief’s Den is the unlock loop: Electrogram for guild contact, Ledger for contracts, Wardrobe for loadout, and Black Market for tools or cosmetics.
Step 1: Join the Thieves Guild First
Before Chameleon becomes relevant, finish the opening job and join the Thieves Guild. The early game teaches you stealth, loot, stash, tools, and basic extraction. Once you return to the Thief’s Den, the game starts introducing longer-term progression.
Do not stay in the opening tutorial looking for Chameleon. The unlock is not there.
Step 2: Follow Guild Contracts, Not Random Runs
After joining the guild, listen for the Electrogram and check the Ledger. This is where the guild gives you contract progression.

Guild calls and Ledger updates are the progression path that matters for Chameleon.
A useful rule:
If the run is not advancing a guild contract, do not expect it to unlock Chameleon.
For example, the Constables Guildhouse chain sends you after Vistara-related files and Staff of Edinburg gems. Completing real contract objectives is more important than farming random loot if your goal is Chameleon.
Step 3: Check the Wardrobe After Contract Milestones
After returning from a contract, check the Wardrobe / Customize Loadout screen. This is where you can see characters, body types, heads, tools, and cosmetics.
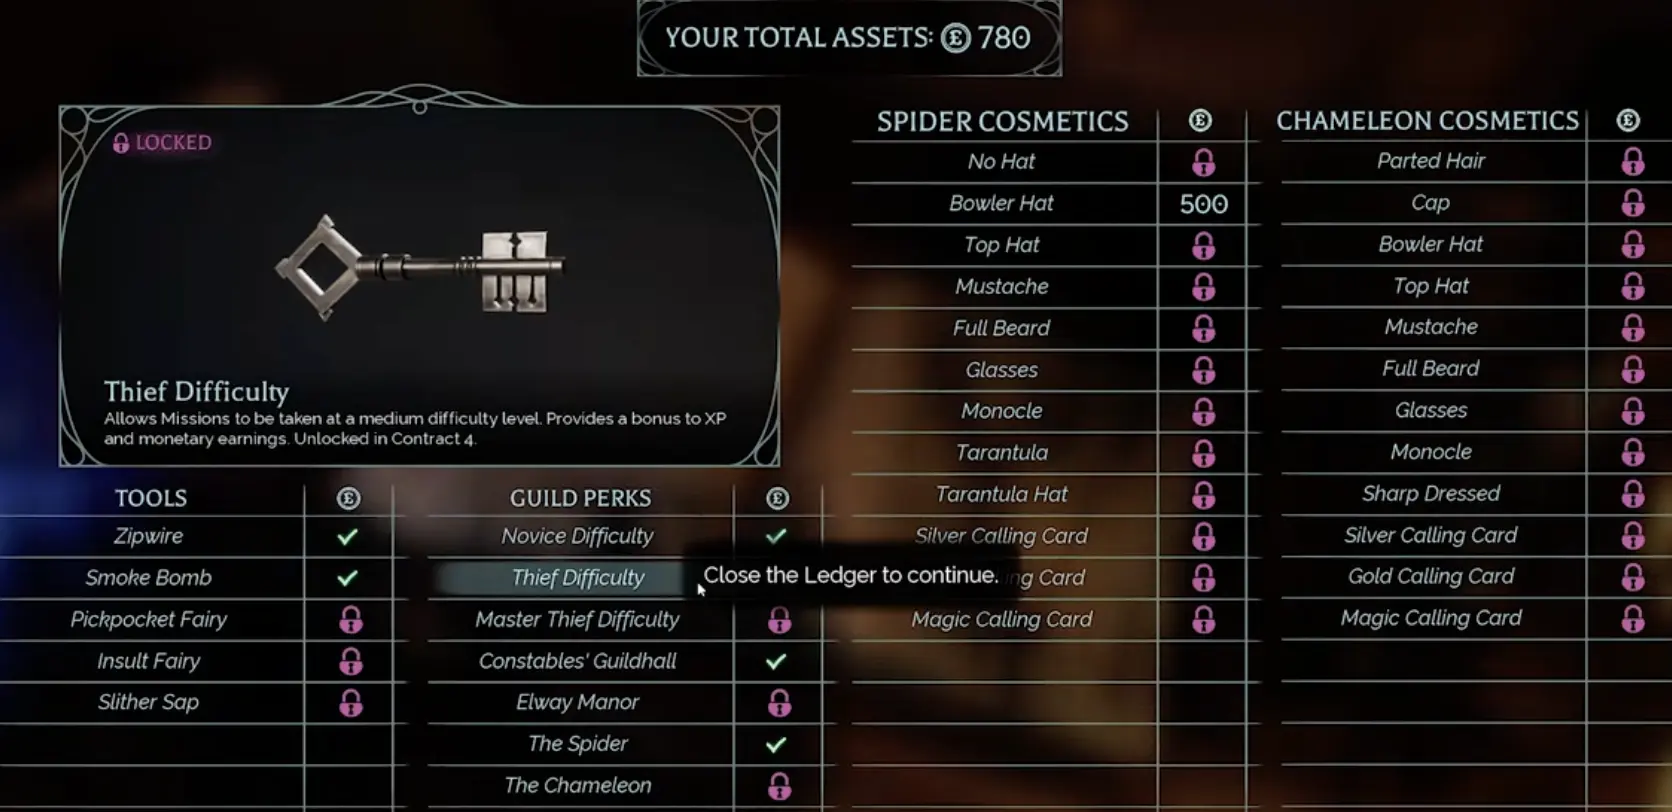
Check the Wardrobe after contract progress. If Chameleon unlocks, this is the screen where the change should matter.
Use this check pattern:
| After this event | What to check |
|---|---|
| You finish a guild contract | Check Wardrobe / Customize Loadout. |
| The Ledger gets a new active contract | Check whether character options changed. |
| You unlock new equipment or maps | Check Wardrobe and Black Market, but do not confuse gear unlocks with Chameleon. |
| You reach the reported 8th contract milestone | Check Chameleon immediately before starting the next run. |
Step 4: Do Not Confuse Chameleon Cosmetics With Chameleon Unlock
The Black Market can show Chameleon-related cosmetics or character-looking items before you fully understand the unlock path. That does not necessarily mean the Chameleon character is playable.
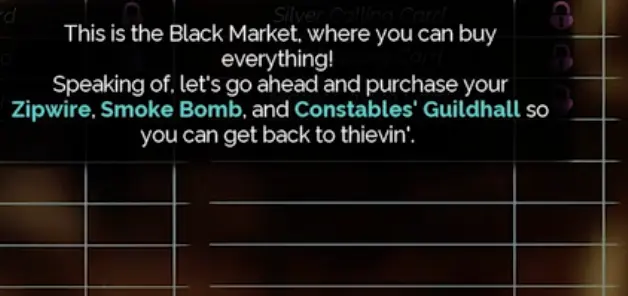
Cosmetics are not the same as character access. If Chameleon is still locked in the Wardrobe, keep progressing contracts.
If you see Chameleon cosmetics but cannot select Chameleon in the loadout screen, continue guild progression.
Spider vs Chameleon: What Actually Changes?
Spider is the early-game character shown as the mobility-focused thief. Chameleon is described as a different playstyle unlocked later through guild favor. Until you unlock Chameleon, build your early routes around Spider’s strengths.
| Character | Practical role | What it means in runs |
|---|---|---|
| Spider | Mobility and acrobatics | Better for learning maps, recovering from bad routes, and using vertical paths. |
| Chameleon | Deliberate infiltration / disguise-style play | Better once you understand patrols, room timing, and route planning. |
| Spider before unlock | Default learning character | Use mobility to finish contracts faster and reach the unlock milestone. |
| Chameleon after unlock | Route control character | Test disguise interactions against normal guards first before relying on it against magic eyes, turrets, or Hauntstables. |
Do not wait passively for Chameleon. Use Spider to clear contracts faster.
Spider’s mobility helps you finish early contracts while Chameleon is still locked.
What We Can and Cannot Confirm About Chameleon Mechanics
| Chameleon mechanic | Current status |
|---|---|
| Unlock source | Confirmed as guild favor / guild progression. |
| Exact favor number | Not verified in the current captured material. |
| Exact unlock contract count | Not fully verified; the milestone to watch is commonly reported around the 8th contract. |
| Disguise duration | Not verified in the current captured material. |
| Works on normal guards | Not verified here with a clean test clip. |
| Works on turrets / magic eyes | Do not assume this. Security devices should be treated separately. |
| Works on Hauntstables | Do not assume this. Hauntstables are a separate pressure enemy. |
What To Do Before Chameleon Unlocks
Keep this short and practical:
| Goal | Best move |
|---|---|
| Unlock Chameleon faster | Complete new guild contracts instead of replaying old routes. |
| Stop dying in Guildhouse | Follow clue chains and use stash before risky routes. |
| Save time | Finish required objectives before optional loot. |
| Make Spider safer | Bring recovery tools like Smoke Bomb or mobility tools. |
| Check progress | Return to Wardrobe after each contract milestone. |
First Run After Chameleon Unlocks
For your first Chameleon run, do not choose the hardest route. Pick a familiar contract where you already know the entrance, clue path, stash, and exfil.
A good first Chameleon test route should have:
- one normal guard patrol you can observe safely;
- one bright route where disguise may or may not help;
- no forced Hauntstable pressure;
- no required turret crossing;
- an easy exit path if the disguise fails.
Use the first run to learn what Chameleon changes. Do not assume Chameleon replaces map knowledge, and do not rely on it against turrets, magic eyes, or Hauntstables until you have a clean test.
Unlock Checklist
Use this checklist if Chameleon is still locked:
- You finished the opening tutorial job.
- You joined the Thieves Guild.
- You answered the Electrogram.
- You accepted new guild contracts from the Ledger.
- You completed contract objectives, not just optional loot.
- You returned to the Thief’s Den after contract completion.
- You checked the Wardrobe / Customize Loadout screen.
- You checked again after major contract milestones.
- You did not mistake Chameleon cosmetics for the playable character.
Common Mistakes
Buying cosmetics and expecting Chameleon to unlock
Cosmetics are not the same as character access. Always check the Wardrobe character selection.
Replaying the tutorial
The Chameleon unlock path is guild progression, not tutorial repetition.
Ignoring the Ledger
The Ledger and guild contracts are the progression path. If you only wander maps for loot, you may not be moving toward Chameleon.
Expecting Chameleon to fix bad routes
Chameleon may change how you infiltrate, but it will not replace map knowledge. You still need to understand clues, exfil, guards, and security systems.
FAQ
How do you unlock Chameleon in Thick As Thieves Game?
Complete guild contracts, earn favor with the Thieves Guild, then check the Wardrobe / Customize Loadout screen. The reported milestone to check is around the 8th contract.
Is Chameleon unlocked from the Black Market?
No, not directly. The Black Market may show Chameleon cosmetics, but the playable character unlock is tied to guild favor and contract progression.
Where do I select Chameleon?
Go to the Thief’s Den and open the Wardrobe / Customize Loadout screen.
Why is Chameleon still locked?
You probably need more guild contract progression. Make sure you are completing active guild objectives from the Ledger, not only collecting optional loot.
Should I keep playing Spider until Chameleon unlocks?
Yes. Spider is strong for early contracts because mobility helps you learn routes and recover from mistakes.
What should I do immediately after unlocking Chameleon?
Run a familiar map first. Test disguise behavior against normal guards, then test security systems and Hauntstable pressure separately.
Does Chameleon work on Hauntstables?
Do not assume it does. Treat Hauntstables as a separate enemy type until you have tested the disguise interaction in a safe route.
Continue Reading in the Thick As Thieves Game Guide Cluster
This article is part of our Thick As Thieves Game strategy cluster. Use these guides to keep learning the game's core systems and routes.
Learn how to survive Hauntstables, bypass turrets, handle magic eyes, and use Slithersap, Smoke Bomb, and Pickpocket Fairy in Thick As Thieves Game.
Strategy GuideThick as Thieves: Contracts, Exfil & Clues GuideLearn how contracts, item collection heists, clue chains, exfil routes, stash points, failure penalties, and difficulty changes work in Thick As Thieves Game.
Map GuideThick as Thieves: Constables Guildhouse Map GuideThick as Thieves Constables Guildhouse guide: Find the Gem of Strength, Arcana, and Vistara Files with confirmed clue routes and exfil points.